
- Author Arianna Cook cook@women-community.com.
- Public 2024-01-12 17:55.
- Last modified 2025-01-23 09:40.
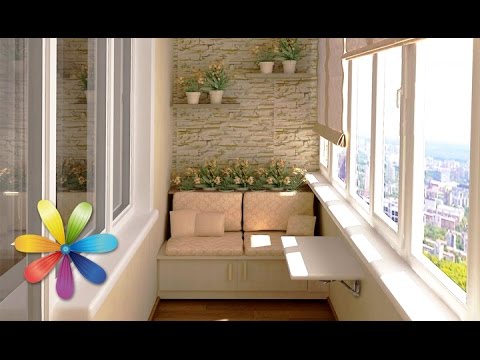
To increase the living space in an apartment, look at how a room is made on a loggia. Balcony furniture can also be made by yourself. With a lack of space, the balcony can easily be turned into a recreation area or even into a living space. If this place is not very spacious, put folding furniture, original hand-made stools and other furnishings here.
Room on the balcony
First of all, you need to glaze the windows in this auxiliary room using double glazing. On the right and on the left, you can make walls, install a heating battery.

The combination of a balcony with a room can be very different. In this version, the entrance to the loggia was made in the form of an arch, decorated with inlay in the form of bricks. Blackout curtains will help to separate these two rooms at any time, turning them into separate ones.
If you want the loggia and the room to be bright, reduce the noise level, then use the option with glass doors. They will visually enlarge the space, making it airy.

It is necessary to insulate the floor and walls on the balcony so that the newly decorated veranda is suitable for living or being here in the cold season. You can set up a small home cinema here, a small family cafe or make a library.
Having removed the window with the frame and the doorway along with the door, you will need to process the rest of the wall. You can turn it into a comfortable bench, decorative panel or resting place for an animal.

Combining a balcony with a room or with a kitchen will allow you to make a bar counter out of the rest of the wall or arrange flowers here, and organize a cooking area in the place of the loggia.

Even a narrow loggia will make the room brighter due to several windows. On such a balcony, you can put a small stylish sofa for relaxation.

The kids will also love the idea of expanding the space. In place of the balcony, you can put a children's sofa with drawers, where the baby will store his toys and other accessories.

For older children, you can put a desk, a computer so that they can study. But you need to think about how to cover the windows on a sunny day. You can hang blinds, curtains or tulle on them.

Then the child will be comfortable, and the monitor screen will not glare.
The following ideas will save you money on your desktop. It is enough to buy 4 corner brackets or fix the processed board on two bars, and a great workplace is ready. There will be enough space at the bottom for the child to put a briefcase here, stretch his legs comfortably.

If you are lucky enough to have a balcony that goes through two rooms at once or through one and the kitchen, then you can transform it into a spacious living room.

The balcony can be turned into a bedroom by placing a bed or a mattress of sufficient thickness and width.

Now you will not run out of space when guests arrive. Someone will be able to sleep on the balcony.

Place a carpeted floor here to keep your feet cozy and soft. Put on a stylish sofa and another room is at your disposal.
Balcony furniture: how to make a stool
If you have a room on the balcony, put this trendy stylish stool here. It takes up little space, so it will be simply irreplaceable in this small area.

For him you will need:
- fluffy artificial fur;
- hairpins for legs;
- lining fabric;
- plywood;
- batting;
- foamed canvas;
- decorative nails;
- foam rubber;
- screwdriver;
- furniture stapler.
Master Class:
- Cut a circle out of plywood, or use this shape. Attach it to the foam sheet, outline it, cut it in a circle.
- Now place these blanks on the batting. Cut it out with a stock. Wrap the edges of this canvas inward, fix in this position with a thread and a needle.
- Place this bulky piece on the wrong side of the faux fur, and cut it out with a little extra.
- The inner circle will need to be closed with a lining fabric, cut it out.
- Join the edges of the fur and lining and attach them to the wood using a hammer and decorative nails.
- Fix the legs for the stool with a screwdriver and self-tapping screws. The stylish thing is ready.

If you decide to combine a balcony with a kitchen, then be sure to put such or a similar stool here. Another original idea will also help you make a little thing that takes up little space, folds like a puzzle.

As you can see, you can use it as a kitchen board or easily carry wine glasses without being afraid that they will slip out of your hands. If one element is not enough, you connect the two. This makes a long kitchen board.
By the same principle, you can make furniture for the balcony, which will be a table and stools.

To do this, first you need to draw notches and rounded parts, then cut them out with a jigsaw. The legs are made from planks, and the lid is assembled from wooden puzzles.
The original decorative table will also look great on the loggia.

To do it, take:
- round tempered glass or durable plexiglass;
- thick boards;
- impregnation for wood;
- saw;
- jigsaw.
This table is without nails and screws. Look at the photo, you will see where you need to make holes in the center of each processed rounded board. Then these elements are connected. For added strength, you can fix them with glue. But if you want to make a collapsible table, then glue is not needed. Place the glass on top and the creation is ready.
Balcony furniture should be functional and take up little space. The next table is made on the principle of a suitcase. The back and front cover look like it. They need to be connected using loops and stops.

A folding table to the balcony will also fit perfectly into this limited space. When folded, it takes up almost no space. When you unfold it, you can use the table as a dining table, for a laptop or papers. You can put a book here, read on this makeshift veranda.

To make a folding table for the balcony, take:
- plywood or chipboard;
- circular saw or jigsaw;
- loops;
- sandpaper;
- puncher;
- paint or varnish for wood;
- long screws.
Using a circular saw or jigsaw, you need to create 4 parts from chipboard or plywood, these are:
- strip 80 long and 5 cm wide;
- one cut measuring 80 by 40 cm;
- two rectangles measuring 60 by 20 cm.
Taking the largest part, draw a semicircle on it using a compass, cut it out along this marking. Then the sharp edges are sanded with sandpaper. Take one rectangular piece measuring 60 x 20 cm, saw it into two triangles.
If you want to decorate the table leg, then use the drill bit to make round grooves of different sizes.

Attach this triangular leg to a 60 x 20 cm rectangular piece using a hinge and screws. The 80 x 5 cm elements must be attached to the wide area of the table using a pair of joinery loops. Cover the parts with paint or wood varnish.

Now it remains to attach the structure to the wall, after which the folding table on the balcony can be used.
You can use a construction coil as this piece of furniture by painting it in the desired color. On the lower circle, you can put various objects, put lanterns, then in the evening the balcony will turn into a romantic corner.

Folding chairs for the balcony with your own hands
Such an attribute of furniture is also indispensable on the balcony, but not only here. The scissor chair presented below will appeal to pets, it can be placed in the kitchen, when a guest comes, spread out. On the summer cottage, such furniture will also look great and take up little space.

Before you make such folding chairs with your own hands, read the drawing.

For him you will need the following blanks and related materials:
- 16 seating slats measuring 29x2, 1x2, 8 cm;
- 1 backrest measuring 65x11x2, 1 cm;
- six legs 76x12x2, 1 cm (for 3 parts);
- support bars of legs - 4 pieces measuring 45x50x2, 1 cm;
- 4 armrests 45x70x21 cm;
- two round bars with a diameter of 1x6 cm;
- two round bars with a diameter of 7, 5x3 cm;
- 4 rods М6х450;
- 32 dowels;
- 8 cap nuts M6;
- joiner's glue.
We start to make a folding chair. Based on the following diagram, cut out the template for the legs from the cardboard, transfer the marked holes to the diagram. On it, cut out a workpiece from a tree, use a jigsaw to cut it out and drill holes in it in the designated areas.

Grab an auxiliary board to handle the curving details on it. Based on the markings, drill in the two holes where you want to glue a pair of dowels. They are needed to fix the legs and process them on such a device.

Having made the first part for the legs, apply it as a template to the rest, cut them out. You should have 16 legs.

Now you need to attach each wavy workpiece to the auxiliary board with dowels and saw them down.

Take four legs, put them on the threaded rods, tighten with clamps. Outside and inside, they need to be cleaned with a rasp so that they become the desired shape.
At the ends of the legs, it is necessary to drill perpendicular holes in order to insert the dowels here, placing them on the glue.

Saw out the seat slats. They and the legs need to be put on 4 pieces of threaded rods, each 45 cm long. These elements will help not only to connect the parts, but also to make the chair foldable.
Use a file to adjust the planks to fit.

Take support bars for legs and armrests, work with these types of parts. On them, you must first mark and then drill the recesses for the dowels, which are fixed with glue.

Using these elements, assemble the chair with your own hands, pull it off with two stubs and an auxiliary board.

With a hacksaw, you need to cut off the threaded rods, remove the excess length, put on chrome cap nuts on the ends of these parts and tighten them. The armrests and the back of the chair must be connected with dowels on one side, on the other, these elements will be fixed freely. To prevent the chair from folding, a round bar with a stopper will help here.

If the previous option seemed a little difficult to you, then start with the simpler one. We suggest making a folding chair with your own hands, which will also come in handy not only on the loggia, but also in nature. It takes up little space, so it can be carried on your shoulder or in your bag.

For this you need:
- three round bars of hard wood with a diameter of 4 cm and a length of 60 cm;
- three washers made of brass;
- 2 blind nuts made of copper;
- a copper bolt with a diameter of 7 cm;
- decorative washers in the amount of 3 pieces;
- bolt loop;
- three screws;
- long screws, 3 pieces;
- thick fabric or leather.
See in what form the round bars are, if required, sand them with sandpaper. Having stepped back 26 cm from the edge of each, make holes in them.

These grooves will be needed to fasten these parts together. To secure them to the seat, drill holes in the top of these legs.
At this stage, you need to process the data of the part with the selected tool for the tree. It can be stain, paint, or varnish. While the liquid coating is drying, cut a 28 cm regular triangle from the material of your choice. If you have a portable chair, then at one corner of the triangle, make a small strap by cutting it out of the same canvas.

Align the holes of the two feet. Insert a long bolt here, putting on the loop bolt to which you will attach the third leg. Do this, fix this part of the structure with a blind nut.

Align the holes in the upper part of the leg and the seat, insert the decorative screw by tightening it.

Cut a belt out of leather or dense fabric, on one side tie a loop on it, fix it on the lower part of the legs. Alternatively, attach them to the seat strap. These do-it-yourself folding chairs can be removed to the balcony. When you want to sit there, or, for example, will plant seedlings, flowers, appreciate such a convenient thing. For a man, this will be a fishing chair, which is very convenient to carry.

Hanging shelves, rack for the loggia
If you decide to make shelves with your own hands to hang them on the balcony, put books here, put flowers, then look at the subtleties of manufacturing.

For these you will need:
- boards or chipboard;
- dowels;
- brackets;
- self-tapping screws;
- drill;
- joiner's glue.
Master Class:
- Attach the brackets with self-tapping screws in the wall, if required, first drill holes here, drive dowels into them.
- To join the boards at the corners, saw them obliquely here, drill two holes in these sections on each side of one board. Pour some glue here, insert the dowels, connect the elements.
- All that remains is to attach the boards to the brackets, put whatever you want on the ready-made shelves.
And here is another interesting variation on this topic. On the balcony wall, you need to fix the pipes using connecting elements. Such an original shelf is quite roomy, despite its small volume.

If you use ready-made furniture parts from MDF or chipboard and curly brackets in a contrasting color, then the shelves for the balcony can be very beautiful.

Also include a spacious shelving in the list of furniture items for the balcony.

For such, racks are made of four bars. Put these elements in pairs, connect them with small bars, on which you then need to stuff boards, which will become horizontal shelves of the rack.
Such self-made balcony furniture will cost less than purchased one. But if you put in diligence, it will be no worse than that.
To make it work, look at the intricacies of making such furniture.
How to combine a balcony with a room, the following video will tell you.


