
- Author Arianna Cook cook@women-community.com.
- Public 2023-12-17 14:23.
- Last modified 2025-01-23 09:40.
The design of floating screeds, the rules for the selection of materials, the method of floor installation, the advantages and disadvantages of coatings without fixing to the base. A floating screed is a way of laying the floor without rigidly fixing the material to the base and walls. An additional layer is located between the outer layer and the base, which in most cases is designed to improve the heat and sound insulation of the room, but sometimes it is used for other purposes as well. We will talk about the technology of installing a floating floor and the rules for choosing a material for it in this article.
Advantages and disadvantages of a floating floor screed

The sectional floating screeds resemble a pie made of several materials, thanks to which they compare favorably in performance with ordinary floors:
- The insulating materials used to create the floating screed retain heat in the room and protect against external sounds. The impact noise that occurs in multi-storey buildings is not audible due to the insulation of the floor from the walls and base. The noise is reduced by almost 50%.
- The floating screed allows you to save on cement, because its layer does not exceed 45 mm.
- The top layer with a topcoat does not deform during temperature fluctuations in the room.
- The low weight of the structure (compared to a conventional screed) reduces the load on the bottom floor.
- Hidden engineering communications can be laid under the floating screed.
- The multi-layer construction ensures the strength and rigidity of the floor.
- The presence of an intermediate layer creates a shock absorption effect when walking, which has a positive effect on the musculoskeletal system.
- The floating screed eliminates unevenness in the base.
- The floor is easy to maintain.
The disadvantages of floating floors are mainly associated with the use of a cement-sand mixture for filling the top layer:
- Sand-cement mortar has a significant weight, floor subsidence is not excluded.
- Cement screed is not resistant to certain chemicals, under their influence it can crumble and break.
- Such a floor without a topcoat does not have an aesthetic appearance.
Floating screed device

Concrete floating screed is deservedly considered very reliable due to the reinforced outer layer. Such floors can bear a lot of weight and are used both in apartments and in industrial premises with an average surface load.
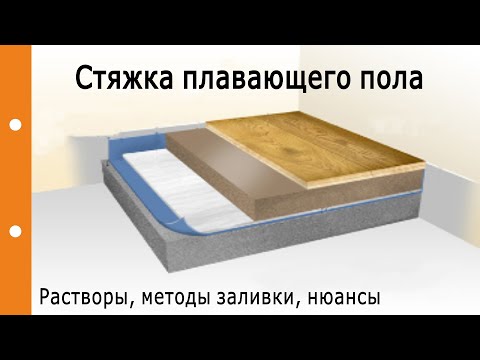
The floating screed device looks like this: floor base, damper tape, waterproofing, heat and sound insulation, intermediate layer, reinforcement, concrete screed. In order to choose the right materials, you should study their purpose in advance and remember the main characteristics.
The base for the floating screed must be firm, dry and clean. Its strength must correspond to the strength of a concrete surface of class C25 / 30. Refinement of the base is performed using mixtures for "light screeds", similar to "Knauf-Ubo". A better coating is obtained in the case of using a special backfill, the fragments of which are glued together. Sand should not be used to level the base.
The damper tape is designed to eliminate the transmission of noise from the base to the walls, which increases the sound insulating properties of the floating screed. It is glued to the walls near the floor along the perimeter of the room to the height of the screed. The damper should be at least 10 mm thick, taking into account the compression reserve from the effect of thermal expansion of the floor covering. Ready-made damper tapes are sold in building stores. You can also cut it yourself from mineral wool or foam polystyrene of the appropriate thickness.
Heat and sound insulating materials are chosen according to their dynamic stiffness (elasticity) and compressibility. Elasticity is measured in MN / m3… The lower the value, the more reliable the shock protection and softer the material. Compressibility indicates the amount of deformation of the insulation after a load is applied. For living rooms, the recommended compressibility is 5 mm at a load of 200 kg / m3… For industrial premises, the value should be less than 3 mm.
For thermal insulation of the floor, the following materials are used: expanded polystyrene - type PSB-S-50 or PSB-S-35, mineral wool, extruded polystyrene. The following coatings are used for soundproofing the premises: Shumanet-1002, Shumanet-100 Super, Izolin PPZ. If you focus on European requirements, it is better to choose mats made from mineral wool and wood wool.
If the insulators are laid in several layers, the compressibility of the entire structure is defined as the sum of the compressibility of all the interlayers. In this case, it is preferable to use materials with the highest strength index. They sit on less durable surfaces.
A separating layer is necessary to prevent the screed from getting into the gaps between the insulation panels. A plastic wrap is laid on the insulation, which is then fixed to the wall. Its thickness: for floors with a heating system - 0.15 mm, for standard structures - 0.1 mm. The film also protects the insulation from getting wet from above and prevents thermal bridging. Its individual parts are overlapped on the floor with an overlap of 80 mm.
The concrete screed is designed to evenly distribute the load on the lower layers. Often, the upper layer of a wet floating floor is made on a cement base, with the addition of sand and plasticizer. You can also use a ready-made mixture that is specially designed for such structures.
When choosing a binding material, you can focus on the characteristics of the screed strength in bending (F) and compression (C), which should be provided by the mortar components. In residential premises, the substance should have a flexural strength of F4 and a compressive strength of C25. If you plan to make a heated floor, choose a material with parameters F5 and C35 and higher.
In Europe, ready-made mixtures for floating screeds are manufactured that meet the listed requirements. They have their own markings. Mixtures with a cement binder are labeled "CT". Calcium sulphate (CA) or calcium sulphate flowable screeds (CAF) can also be used.
For self-preparation of the mortar, you can purchase cement of the CEMI… SEMSH category and class 32, 5. It is easy to recognize it by the light brown marker on the package. The material of the PC-500DO brand also possesses similar properties.
It is recommended to use only mortar sand. In river grains of sand, they are turned, rounded, they adhere worse to cement. The floor from such a solution will crumble after drying. To strengthen the screed, gravel or crushed stone is added along with the sand.
A plasticizer is necessary to increase the plasticity of the solution and improve the smoothing of the material during installation. Also, screeds with the addition of this substance crack less.
If you are not sure how to make the floating screed stronger, add modifiers to the solution. They are able to increase the strength of cement grade M400 to the strength of M800, and also increase the resistance of the floor to aggressive chemical solutions.
Reinforcement of floating structures is optional, but in some cases it is indispensable. For example, the mesh is used to strengthen the screed in the manufacture of underfloor heating, prevent cracks in heavily loaded coatings, and prevent ledges on floors.
For reinforcement, a ready-made metal mesh made of wire with a diameter of 2 mm with cells of 5x5 mm is used. Fiberglass or polypropylene fiber can be used instead. Fiber reduces the risk of cracking when the floor shrinks or the mortar hardens.
Floating screed installation technology
Installation of floating floors is a complex process due to the presence of several layers of different materials. The work on the construction device contains several operations that are completely different in content.
Preparation of the base before installing the floating screed

The floating floor screed may be installed on a solid base, which is not inferior in strength to a concrete surface of class C25 / 30. The best option is a concrete screed on a hard surface. Preparation of the base involves the following operations:
- Dismantling the old pavement down to the concrete slab.
- Cleaning the surface from dirt and debris. It is not allowed to leave any extraneous ingredients on it that could weaken the concrete floor.
- Washing and inspection for defects in the base.
- Sealing deep crevices and gaps with cement mortar or other mixtures.
- Leveling the surface to eliminate large slopes with cement screeds.
- Treatment of the base and lower part of the wall with antiseptic preparations. The impregnation will reduce the risk of mold, mildew and moisture in the room.
Creation of insulating layers

If the work is carried out in a dry room, waterproof the base with plastic wrap, going up the wall to the height of the screed. To make a floating floor in a shower or bathroom, treat the base with bitumen mastic and cover with membrane waterproofing, also going up the wall. The joints of the foil should be made with an overlap of 80 mm. Seal its joints with tape.
Place the damper tape around the perimeter of the room with its end on the floor and glue it to the wall. Prefabricated dampers have a self-adhesive surface with protection. Self-made tapes can be fixed to double-sided tape. Make sure that its height is higher than the planned thickness of the floating floor.
Decide on the thickness of the floating screed, taking into account the heat and sound insulation of the floor and the thickness of the concrete mortar. The recommended thickness of the top leveling layer is 45 mm. Draw two horizontal lines on the damper tape to indicate the location of the top of the insulation (bottom) and the floating screed (top).
Before installing the insulation, make sure once again that the subfloor is level and that the panels will not sway. If necessary, you can trim the bottom of the insulator.
Lay the material adhering to these rules:
- It should cover the entire area.
- Lay the sheets tightly to each other, no gaps are allowed.
- The top surface of the insulation should be in the same plane.
- No steps are allowed.
- If the insulation is put in several layers, arrange the panels in a checkerboard pattern so that the seams do not coincide vertically.
- The top surface of the mats should be in line with the bottom line marked on the wall.
Place plastic wrap on top of the installed insulation to create a protective layer. If the intermediate layer is made up of several pieces of film, place them with an 80 mm overlap. Glue the edges to the walls with a slight step.
Installation of beacons for filling screed

Smoothing of the leveling (cement) screed is recommended to be carried out on pre-prepared bases, which are called beacons. The bases can be pieces of laths or profiles placed on an insulating layer. Their installation is carried out as follows:
- Install the strips on the insulators parallel to one wall. The distance between the beacons depends on the size of the building ruler, which will rest on them when leveling the floor.
- Align the upper surfaces of the lighthouses in one horizontal plane using a hydrostatic level.
- Make sure that the base surface of the beacons is in the same plane with the upper line on the wall, indicating the level of the floor screed.
Preparation and pouring of the solution

The pouring solution is prepared from sand and cement in a ratio of 1: 3 for walk-through areas or 1: 4 for residential ones. The solution is mixed as follows:
- Pour the calculated amount of water into the container.
- Pour the cement into it with constant stirring.
- When a homogeneous mass is obtained, pour sand into the container and mix everything.
- In small quantities, it is allowed to add a plasticizer to the mixture, which makes the mixture more elastic. You can find out its amount from the recommendations on the packaging of the product. After hardening, the solution with the plasticizer does not crack.
- Make sure that the solution is not too liquid, because in this case the water will come to the surface and dilute the cement laitance, which will lead to a loss of strength of the floor.
Place small stones on the insulation and a reinforcing mesh on top. Make sure it sits in the middle of the leveling layer. Pour the solution between the beacons and immediately level it with a long ruler supported by the beacons. The mixture should not be above the beacons and the top line on the wall. You need to work quickly until the solution begins to crystallize.
Repeat the procedure and fill in the entire area between the two beacons, the field of which go to the next one. Dismantle unnecessary beacons and align the openings flush with the rest of the surface.
Features of drying floating floor screed

After pouring the entire floor, it is necessary to create conditions for drying it. For high-quality drying of the screed, the temperature in the room should be + 10-25 degrees, and the humidity should be in the range of 40-60%. During drying in the room, drafts and sudden temperature changes are not allowed. This process should not be accelerated, although it can take up to 30 days.
Follow these guidelines while drying:
- Cover the screed with plastic wrap for 4-7 days, which will reduce the evaporation rate and ensure uniform drying of the concrete throughout its depth.
- Check the humidity of the floor periodically. When dry, moisten it with a spray bottle. The presence of moisture on the inner side of the film means over-wetting of the coating, which is also unacceptable.
- After 3 days, the floor will be strong enough to walk on.
- After 5 days, you can continue repair work in the room that is not related to the floor, but it is still not possible to load the screed with a large weight.
- Check the surface quality one month after pouring. Grind the protruding areas, and fill the underestimated areas with a self-leveling mixture.
After the floor has dried, the floor covering is laid on it in accordance with the wishes of the user.
Correction of defects in floating floors

Floating screed defects that appear after the floor dries are very difficult to fix. Therefore, take the work you do seriously.
Failure to follow the technology of laying the floating floor may result in the following defects:
- The floating floor does not sufficiently dampen the external noise due to the absence of a damper tape between the screed and the walls.
- The walls at the junction with the floor were not plastered before the mortar was poured.
- Cracks appeared on the surface due to uneven installation of the insulating layer.
- Insulation plates are laid carelessly, with large gaps, which reduces the sound insulation characteristics of the structure
- The surface is not leveled, which leads to additional costs for processing the floor before laying the topcoat.
How to make a floating screed - watch the video:
To obtain a high-quality result when setting up the floor yourself, it is necessary to observe the floating screed technology and choose the right material. Only under this condition is the long-term operation of the floor covering with high heat and moisture insulating properties possible.


