- Author Arianna Cook cook@women-community.com.
- Public 2024-01-12 17:55.
- Last modified 2025-01-23 09:40.
Find out how to make a dinosaur out of paper, plasticine. And for a celebration, you can bake a lizard-shaped cake or create a decoration from mastic and decorate baked goods with it. Children tend to take an interest in the unknown. They love stories about animals that you won't even see in the zoo. Some kids want to know how to make a paper dinosaur in order to make it. If you bake a birthday cake in the shape of this animal or decorate a dessert with it, the child and his little guests will be indescribable delight.
Giant Reptile Mastic Cake Topper
Read how to make a fondant dinosaur and make a delicious cake with this character.
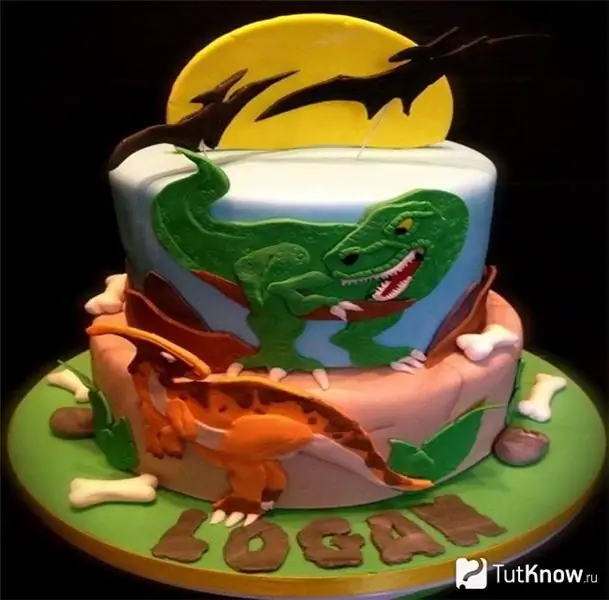
If the child is a teenager, then he will like these reptiles. For toddlers, it's best to fashion the friendlier ones. And the data is made from mastic. For the cake provided, 3 biscuit cakes were baked. The lower one is in a wide low shape. The other two are in forms of smaller diameter, but in tall ones. After that, each of the upper cakes is cut horizontally into 3 parts, which are coated with cream.
Then all the floors of the cake are covered with mastic of a certain color. After that, dinosaurs are glued using:
- squirrel;
- water;
- or food paint.
To make the dinosaur, which is located at the bottom, you need to drop a little orange or yellow food coloring into the white mastic, remove the mass, and then roll it into a layer 5 mm thick. He also needs brown mastic, from which we create a pattern on the back, along the tail and legs. In order to make mastic decorations in the form of animal claws, use a white mass, as for the teeth of a green reptile.
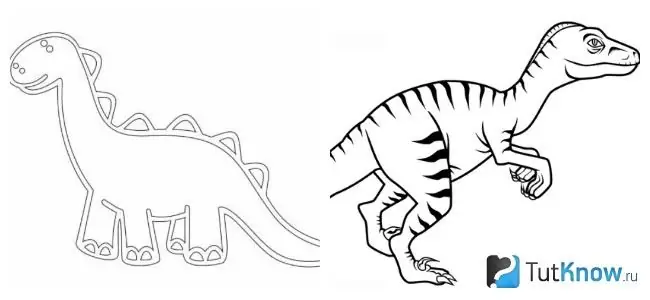
To blind them, cut off a strip from a thin layer, shape the teeth in the center with a knife. Divide the workpiece in half - you have teeth for the upper and lower jaw of the animal. For his body, you need to drip a little green food paint on a lump of mastic, knead it, roll it out and cut the figure of the beast according to the template. Below are two. Choose any and use as it.
If you don't have food coloring, use carrot juice instead of orange. Green replaces spinach, and red replaces cranberry. Homemade mastic should dry out for a day, or even two in the air, after which the cake can be used for its intended purpose.
Mastic Dragon - 3 Examples of Sweet Creativity
A child may well make a reptile with his mother. Dinosaurs from plasticine are molded in the same way as from mastic. It will be interesting for children to create these animals from the sweet mass, because then it is so pleasant to eat the result of their labor.
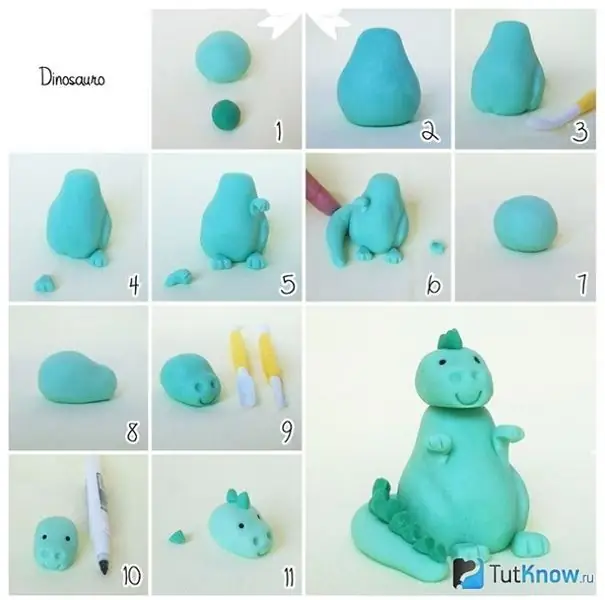
The dinosaur here is blue, but you can use any other. First, let the child roll 2 circles - one less, the second more. Now they need to be connected by placing the small one on the large one to get the body of the beast. Mark with a knife or a thin stick the upper part of his hind legs and stick down the triangular legs and also 2 up, attach the tail.
Further, an oval is molded for the head, a wooden stick is used to indicate the nostrils, the nose of the reptile. From small volumetric triangles you need to make "thorns" from the head to the tip of the tail. Now it is necessary to dry such cake figures well at room temperature so that they do not subsequently "float", and you can decorate pastries.
See how to make a dinosaur cake. It can be a dessert dedicated to a fairy-tale character so similar to this one. Read on to learn how to make a dragon that you can and should then eat.
For him, biscuit dough was baked, and butter cream was prepared from the following products, used:
- 1 egg;
- 250 g butter;
- 200 g sugar;
- 150 ml of milk;
- 1 bag of vanilla sugar.
First, the egg must be mixed in a saucepan with milk and sugar with a whisk. Put on fire, bring to a boil, cook for 5 minutes, stirring constantly. Cool down. Then, add the milk mass to the whipped butter, one spoon at a time, continuing to beat.
Next, the biscuit layer is cut out with a sharp knife in the shape of a dragon. Enlarge the submitted photo, redraw it onto paper, use it as a template.
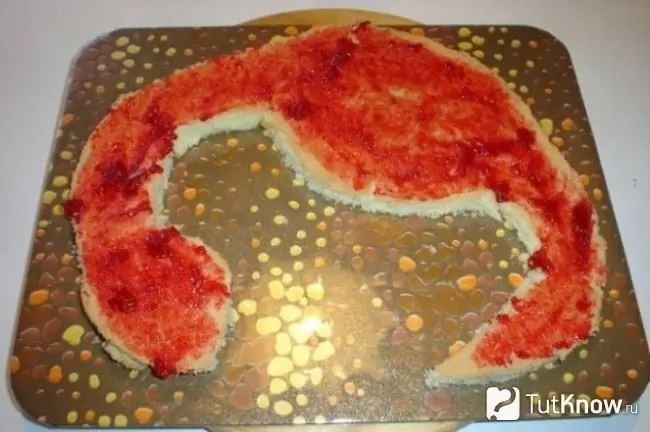
On the first layer, you need to apply cream, cover with exactly the same biscuit, which is smeared with jam. On top we put the third cake in the form of a dinosaur. We grease it generously with butter cream.
If you prefer chocolate, then add instant cocoa to it when cooking cream. If you use the usual one, in this case, first stir it with warm milk, then pour into the boiling mass. Place a piece of biscuit on the back and head of the character.
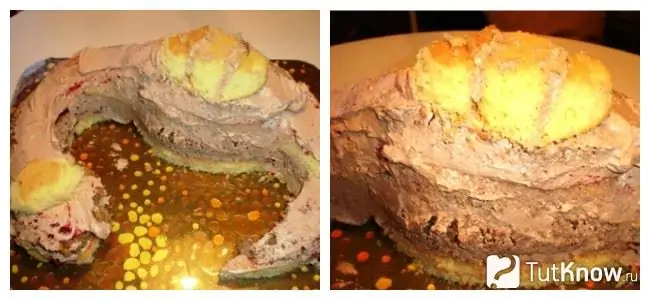
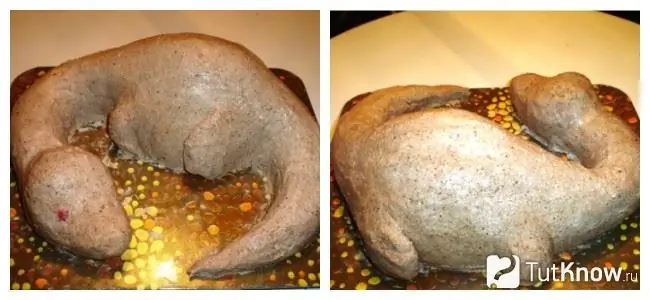
Do not throw away the cakes. Grind them, mix with cream. Spreading this mass on the base of the cake, mold a dinosaur out of it completely.
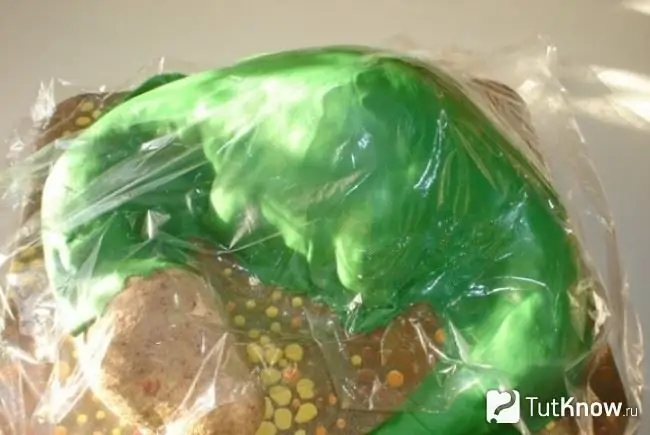
Now cover the figurine, except for the head, with a layer of green mastic. Cover with cling film, refrigerate overnight.
In the morning, take out a homemade cake, cover the animal's head with mastic, decorate it as your fantasy tells you.
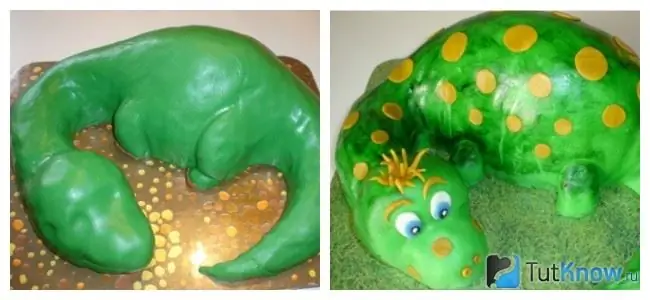
Now you know how to make a dragon so that it turns into a cake. If you want to mold a dinosaur from mastic, see a simple example.
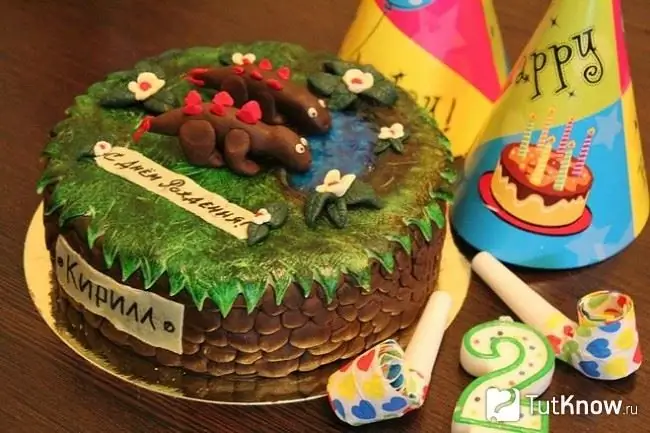
This cake will take everyone who contemplates it, many millennia ago. Create a corner of nature at the time. Here's how to decorate a cake at home to make it look like a renowned pastry chef.
For him, take:
- mastic;
- food paints;
- knife;
- molds;
- silicone rolling pin;
- marzipan mass.
Lay a sheet of mastic on the cake smeared with cream, roll it over the surface with a rolling pin. Now tear off a piece from the marzipan, place them on the sides of the cake in the form of pebbles. If you do not have such a mass, you can bake a chocolate butter biscuit and use it.
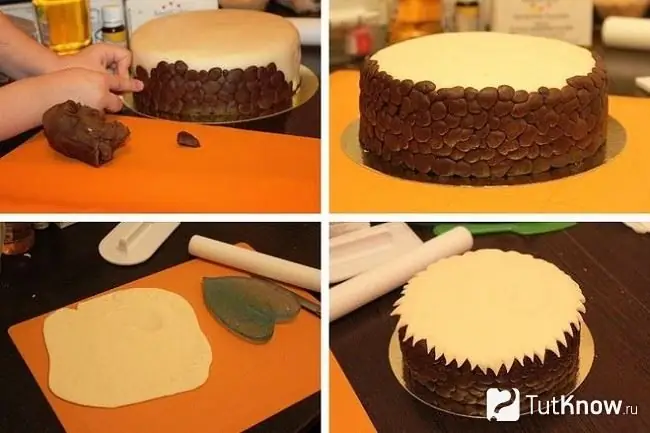
Now you need to roll out another layer, painting it green. Cut out the edges in a zigzag, make a hole in the center, slightly to the side, for the lake, using a pastry iron or the back of a knife.
Now, from brown mastic, this is how you need to make a dinosaur: we sculpt its body with a tail, then attach the legs, make small details. Create flowers from mastic, and add texture to the leaves using molds.
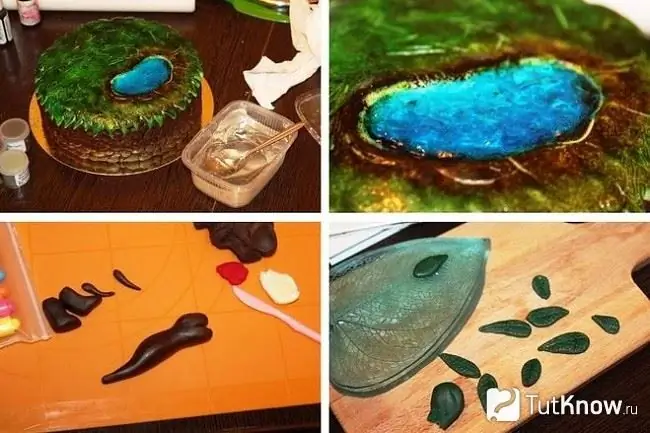
Write with mastic to whom the cake is addressed and after drying, hand it to the birthday boy.
Now that you know how to make a dinosaur from mastic, you can explain to your child how to create one from another material. The manufacturing principles are very similar.
How to make a dinosaur from plasticine?
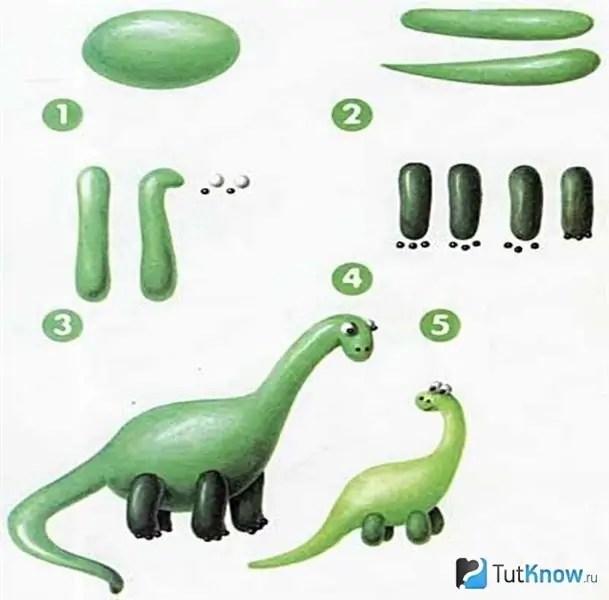
The figure shows what parts a large and a small animal consists of. We sculpt the body in the form of an oval. The tail looks like a long cucumber, the tip of which needs to be sharpened. For the head, a piece of plasticine must first be rolled into a "sausage", then bent on one side so that the head appears on the neck.
For the legs of the lizard, let the child knead the plasticine, roll 4 ovals out of it - 2 a little more - these are the front legs, and the other two will be slightly smaller than these - these are the hind legs. One paw claws are made from three small lumps of plasticine.
It remains to collect all the details and this is where the cognitive lesson ends. If you don't want to complete it, then read how to make a dragon so that it looks like a cartoon character. It can be molded not only from plasticine, but also from polymer clay, from mastic.
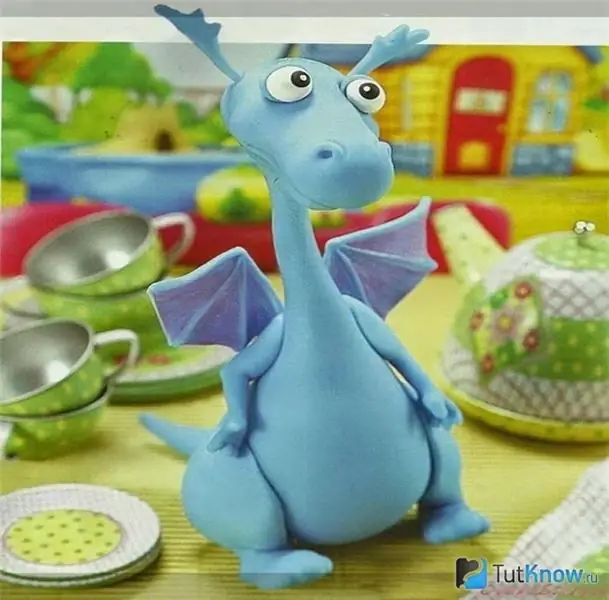
This master class has prepared already numbered photos for you. Looking at them, you can carry out all the stages in a given order and make a dinosaur out of plasticine.
Here's what you need to have with you for this needlework:
- plasticine of blue or other color;
- small balls - 2-3 pieces;
- plastic knife;
- toothpicks;
- hook;
- beads.
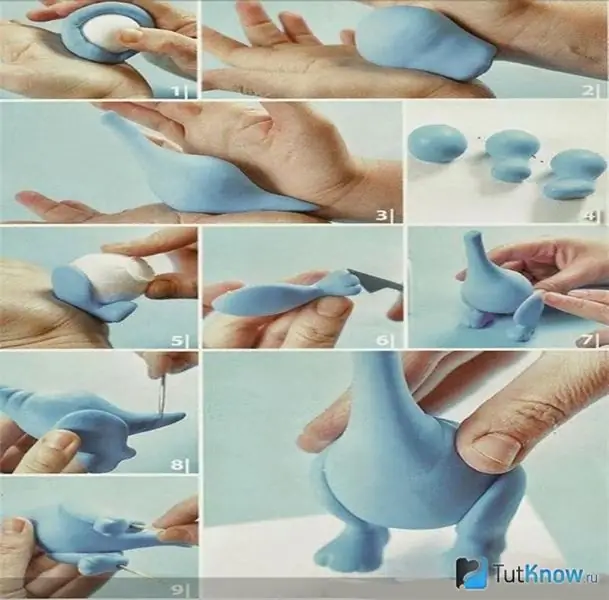
Mash up the blue plasticine.
If you do not have a blue plastic mass, use any other plasticine, taking the material of your favorite color. Roll out the plasticine in the shape of a pancake, put a ball inside. Close the hole. Blind the nose in front of this blank.
Also, using the second ball, make the body of an adorable dragon. Then sculpt its legs. To make them flat at the top, rub this part with your hand or with a small ball. Mark your fingers with a knife.
Use it to create a couple of folds on the back. Attach the hind legs, tail.
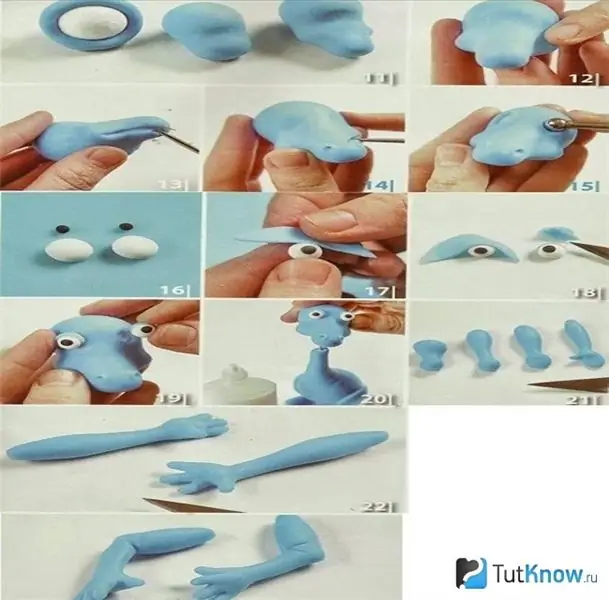
Let's take care of the animal's head. Use the hook to mark his mouth and nostrils. Decorate the hollows for the eyes by clicking here with a bead. The eyes are composed of protein - these are 2 larger balls and the pupil - a smaller circle.
For the upper eyelids, roll out the plasticine of the desired color thinly, give it a triangular shape, round the bottom corner. Pin the eyes in place. This can be done using pieces of a toothpick and a small button on the leg, securing the eye sockets on it.
The steps for making the front legs are given in the following figures.
Attach them and start making the wings. For each, a volumetric triangle is molded, then you need to arrange the veins, as in the photo. Wrap 2 beads with pieces of plasticine, attach to the wings, and the other side to the back.
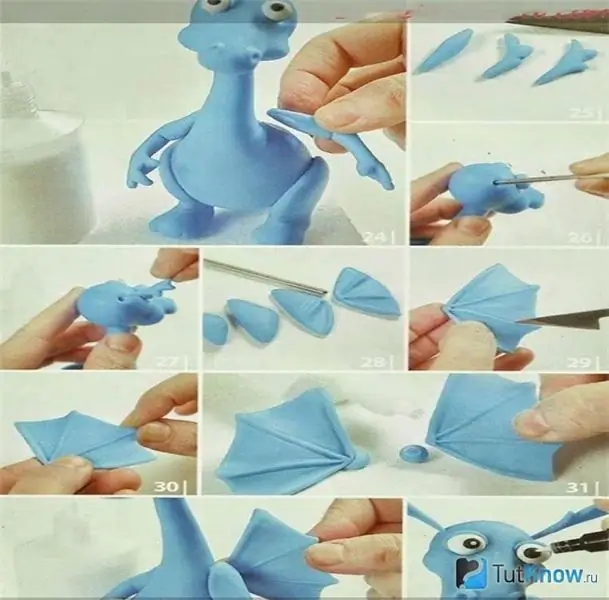
This is how plasticine dinosaurs are made. If you want to craft them differently, check out the following interesting ideas.
Create a Dinosaur from Cardboard and Paper
Origami is a very interesting type of needlework. By folding the paper in a certain way, you get a lizard. How to make such a dinosaur using the origami technique from paper, diagrams for beginners will help them not get confused. Explanations will also make things easier.
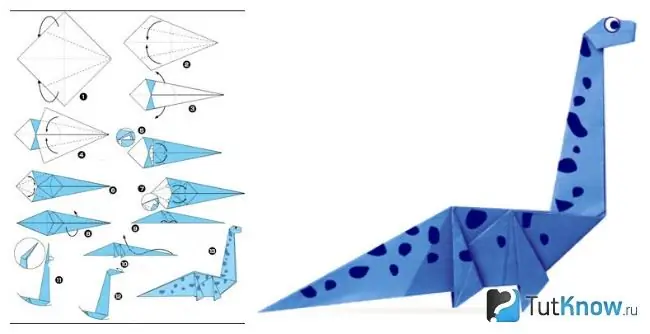
For origami, use heavyweight paper. It should be two-sided, that is, from the face and from the inside, painted in some color. Fold it diagonally first. Then fold back the 2 corners as shown in the second picture. This will place the faces on a diagonal line. The photo shows how the dinosaur is done according to the origami principle. You can also watch a video with step-by-step making a reptile at the end of the article.
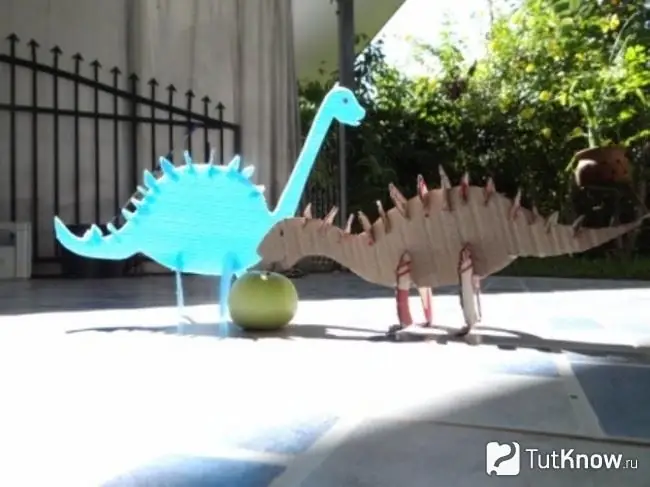
If you feel like staying with the lighter option, check out the following. This lizard was made of thick paper - cardboard.
Draw the outlines of the body, legs, thorns of the future dinosaur on cardboard, cut out.
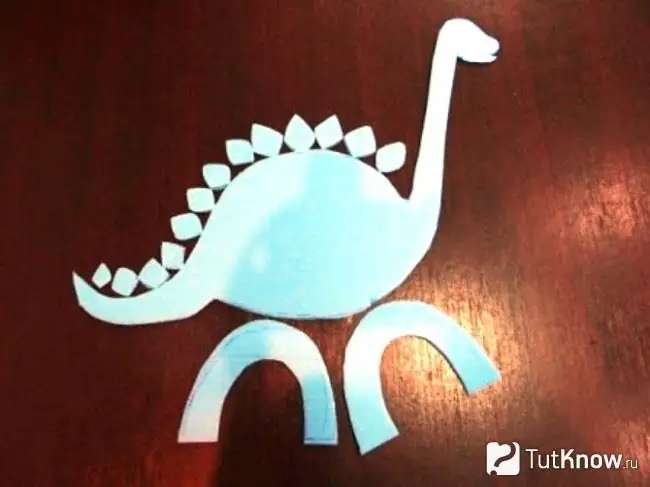
Make 2 incisions on the abdomen, insert a pair of legs into each. Then make a few small cuts in the back for the spikes to be fitted to the body as well.
Carnival raptor masks
Speaking about how to make a dinosaur, it is worth noting that you can turn any person into it for the time being, and also use unexpected materials to create a dinosaur. See how interestingly the plastic canister was cut to become the dragon's head.
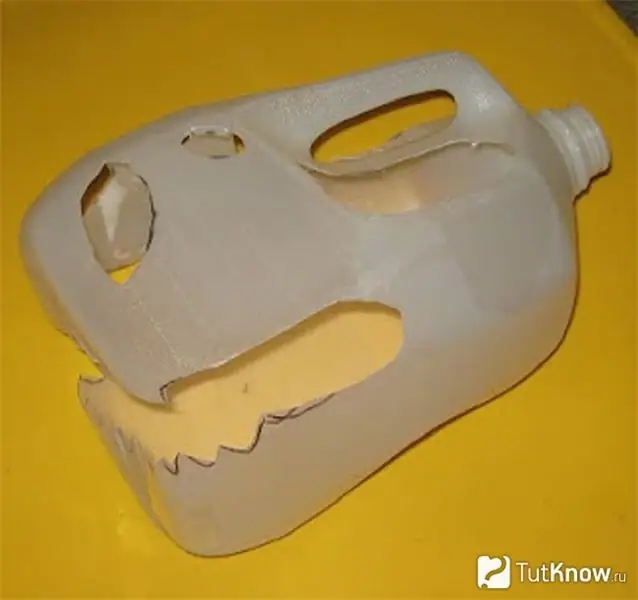
Only 3 items helped to create it, these are:
- canister;
- felt-tip pen;
- knife.
First, draw a hole for the mouth, teeth at the bottom of the container. On the side above, near the lid - for the eyes, and on the side below - the nostrils. Carefully cut out these parts of the face with a knife. You can make 2 more exactly the same lizard heads, attach them to metal or wooden rods, on which soft hoses are put on, you get an interesting sculpture for a summer residence - a three-headed dragon. Its body can be turned into a black garbage bag filled with non-rotting material.
If you do not know how to make a dinosaur, but you need to make a mask of this animal, take:
- cardboard;
- scissors;
- white double-sided tape;
- newspapers;
- PVA glue;
- white cardboard;
- paints.
First, cut out the base of the mask from cardboard. Two large stripes will be the jaws of the raptor. The upper one is flat, and the lower one is rounded at the place of the cheekbones. These 2 parts are connected using a thin strip, which will be located at the back of the head.
Now measure the head of the person for whom you are making the mask with your own hands, cut another strip of cardboard along its diameter, glue its ends together. Determine the section of the head from the hairline to the back of the head, cut a strip of this size, glue it in place. With the help of PVA, 2 horizontal fragments are attached to it, the upper edges of which must be glued to the top of the mask.
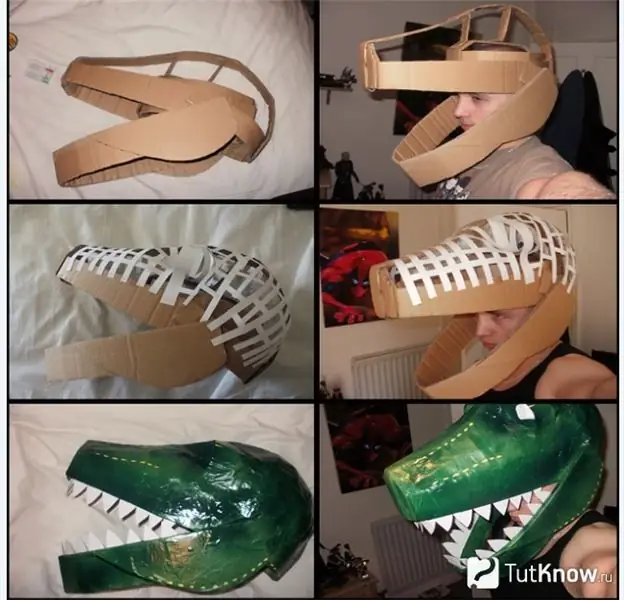
Let the glue dry, leaving the mask overnight. The next day, attach many strips of duct tape to it, decorating the eye sockets. Now you will be making a papier-mâché dinosaur.
Remove the top protective film from the tape, glue the newspaper on these strips. Take the second, grease it with PVA. Glue to this, then the next, and so on, until the mask is tight enough. Now you need to let it dry thoroughly and only then paint it. When she's dry too, it's time to go to the costume ball to showcase your creation.
In the meantime, the mask is drying, we suggest watching the promised video:

The following story will be useful for children, as it shows how to make a dinosaur from plasticine:


