
- Author Arianna Cook cook@women-community.com.
- Public 2023-12-17 14:23.
- Last modified 2025-01-23 09:40.
Technique for fixing mineral fiber ceilings, types of slabs, methods of installing the frame, step-by-step instructions and useful tips to facilitate installation work. Mineral fiber suspended ceilings can often be seen in offices, offices, shopping centers. They are very popular for their performance characteristics. At the same time, they look stylish and modern. Note that for their installation, you will not need to call a team of craftsmen. All work can be done even with your own hands.
Advantages and disadvantages of mineral fiber ceilings

Before deciding on such a ceiling finish, you need to familiarize yourself with all the pros and cons of the mineral fiber suspension system.
The main advantages are in the following parameters:
- Moisture resistance … Plates can be installed in rooms with high humidity, but if you are flooded from above, they will still deteriorate under the influence of dirty and rusty water.
- Soundproofing … The material has excellent sound absorption.
- Light reflection … The covering of the slabs reflects 83% of the light, and therefore it will be light in the room, but due to the specifics of the texture, there will be no glare and glows on the ceiling.
- Price … The price for one tile starts from 50 rubles. This is a relatively inexpensive way to finish the ceiling, especially if you also install the tiles yourself.
- Possibility of repair … Having damaged one structural element, you can easily, quickly and cheaply replace it without dismantling the entire ceiling, which cannot be said about structures made of gypsum board, if damaged, the finish will still suffer.
- Disguise communications … In the interceiling space, ventilation ducts, pipes, wiring can be placed. This is a feature of all suspended and tension structures, but only in this case quick and easy access to all communications is provided.
- Security … The material is completely safe. It does not emit harmful substances into the environment and does not burn at all.
- Masking basecoat flaws … The installation of mineral fiber boards does not require a perfect leveling of the ceiling.
As for the disadvantages of this solution for finishing the ceiling, they include:
- Reducing the height of the room … Like all suspended ceiling structures, mineral fiber ceilings will take up some of the space. For offices and tall rooms, this is not a problem. At the same time, in an ordinary Khrushchev, this option cannot be called successful.
- Difficulty in leaving … Rough coating, fine-pored structure of the plates, light surface - due to these factors, any contamination will be very noticeable and unlikely to be washed off.
- Limited stylistic solutions … This is a standard finishing option, and therefore it will not work to embody original creative ideas here (for example, designer lighting, a combination of different colors and textures).
Based on the above advantages and disadvantages of the material, we can conclude that mineral fiber plates are an excellent solution for an office or living room with a high ceiling, where there are no sources of pollution and the likelihood of flooding by neighbors from above. Thus, the kitchen is not the best option, but in the corridor, such a finish will look appropriate.
Mineral fiber ceiling installation technology
The structure is a crate sheathed with mineral fiber plates with an open profile. To complete the installation work with your own hands, you must first fix the frame, and then complete its sheathing. It is also important not to forget about the preliminary marking on the ceiling to comply with the geometry of the room.
The choice of material for mineral fiber ceilings

To install such a ceiling, you will need profiles, fasteners and the plates themselves. The latter are available in two standard sizes: square - 0.6 * 0.6 meters, rectangle - 1.2 * 0.6 meters.
You can purchase standard models or moisture-resistant ones, depending on the specifics of the room in which you plan to install the structure. The exact dimensions of a square tile are 59.5 * 59.5 cm. The standard thickness is 1.2 cm. The standard packaging of the material consists of 20 parts that can cover the ceiling with an area of 7.2 m2.
Also during the work you will need:
- Stringers (traverses) … These are guide rails designed to stiffen the crate. They are larger and more powerful than other ceiling slats. Only their length is three, four, or even six meters.
- Ceiling slats (12 cm and 6 cm) … The first ones are fixed in the slots of the stringers and participate in the set of the main frame, and the second ones are stacked between the first ones to form cells.
- Wall-mounted L-shaped profile … It is not a load-bearing, but rather a supporting structural element. Its length is usually three meters, and the width of the shelf is 1.9 cm.
- Suspension clip with spoke … This part is required for attaching stringers to the base coat.
- Fasteners … For reliable fixation, you will need nylon dowels (30/6, 40/8) and self-tapping screws (19 * 3, 8, 25 * 4, 2, 32 * 4, 2).
As for the profiles for the frame, suspensions and fasteners, galvanized parts are used in conditions of high humidity. They are resistant to corrosion.
Don't forget about the tools. We need a hammer drill or a drill (depending on the type of base surface), a screwdriver, scissors and a circular saw for metal, a laser level (you can also use a construction hydraulic level).
Preparatory work before installing the mineral fiber ceiling

Preparing for the installation of mineral fiber slabs for the ceiling is practically the same as before installing suspended or tension structures.
The main tasks of this process:
- Remove loosely fixed elements so that they do not subsequently crumble and put pressure on the finish.
- Get rid of rust, mold and mildew stains, which after a while will appear on the new coating.
- Prime the base surface with a composition with antiseptic components to prevent the appearance of fungus and insects.
At the same stage, it is worth thinking about wiring. If you are planning to replace it, now is the perfect time.
Drawing and marking of mineral fiber ceilings

All elements of the lathing are much easier and faster to fasten according to the markings already applied to the walls and ceiling. In this case, after fixing each part, you do not have to take up the tape measure again to measure the distance. For work, you need a level and a chopping paint cord.
In the process, we adhere to the following action plan:
- We measure the height of all corners of the room and its center.
- In the lowest corner from the top point, we measure the distance between the ceiling space. It depends on the number and type of communications to be placed, but it cannot be less than 10 cm. Please note that additional centimeters will be needed for built-in lighting.
- With the help of the building level, we transfer the mark made to all corners.
- We pull the paint cord between them and beat off the lines in one plane. This will be the level of the suspended structure.
- We mark on the ceiling the attachment points of the suspensions with a pitch of 120 cm.
It is desirable that the diagram is pre-printed on a sheet of paper. Mark on it immediately the location of the fixtures and the path for laying the wiring.
Rules for creating a framework for a mineral fiber ceiling

All elements of the lathing are fixed according to the previously applied markings in the following sequence:
- We install the edging profile, placing fasteners in increments of 40 cm. It should be located strictly along the line on the wall.
- We fix the suspensions on the ceiling in the places marked earlier. To fix parts in reinforced concrete, choose anchors, but for ceilings made of wood or metal, you can use your own suspension systems.
- For the installation of the lathing with a linear set with a step of 1, 2 meters, we bait the traverses.
- We pull the cord perpendicular to their fastening to maintain horizontal alignment and align the suspensions.
- We connect them, transversely installing 120-ki rails with a step of 0.6 meters.
- We attach 60 rails parallel to the traverses with a step of 1, 2 meters. They must be fixed in such a way that each 60 is in the middle between two traverses.
- For the chess set, we also fix the traverses with a step of 1, 2 meters.
- If necessary, extend the length with end locks. Please note that you can cut profiles using a grinder and metal scissors.
- We connect them together with 120-kami transversely located with a step of 1, 2 meters.
- Parallel to the traverses with steps 1, 2, we install 120-ki so that each rail is in the middle between the two traverses.
- We attach 60 rails across the traverses with a step of 1, 2 meters so that each part is in the middle between two 120s.
With a chess set, 60s do not perform any bearing role. These are just partitions. When attaching the ceiling battens, be sure to use a level to maintain horizontal alignment.
The chess set is considered more durable and is suitable for installing the structure in large rooms (offices, halls). But for installation in the corridor, you can use the linear dialing scheme. In a long and narrow corridor, 120 ceiling slats can be omitted. A combination of traverses and 60-k will be enough.
Fastening mineral slabs to the ceiling

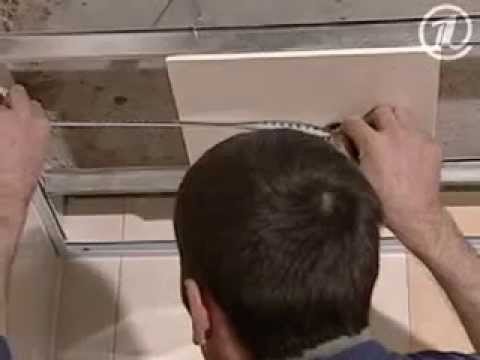
After the lathing has been built, the slabs themselves can be installed. This should be done according to the following instructions:
- We lift each part diagonally to a level above the frame and place it on top.
- We use a sharp knife to cut individual elements. Please note that you only need to cut on a hard horizontal surface, because the material is fragile.
- We calculate the fastening of the material so that the extreme plate adjacent to the wall is not cut off by more than half of the product itself.
- We install built-in lighting.
Please note that work on laying mineral fiber slabs should be carried out at a room temperature of at least +20 degrees and an air humidity of up to 70%.
Useful Tips When Installing Mineral Fiber Ceilings

To avoid the most common installation mistakes, read the following guidelines. These simple tips will help you make your job much easier and speed up the process:
- If you have purchased a tile, but are not going to mount it yet, please note that it should be stored exclusively in a horizontal position.
- It is impossible to install the structure if the room has just plastered or putty coatings (especially the ceiling). When dry, the finish layer will evaporate moisture, which will negatively affect the condition of the boards.
- All communications in the interceiling space should be fixed on autonomous suspensions to the base surface so as not to create pressure on the suspended covering.
- Be sure to place the wiring in a corrugated pipe made of non-combustible plastic. If the insulation is damaged, the wire should never come into contact with the metal parts of the frame.
- When placing an additional heat insulator in the interceiling space, please note that the maximum permissible load on the mineral fiber ceiling should be less than 3 kg per 1 m2… Therefore, the roll insulation should be fixed to the crate or base coat.
- When installing suspended mineral fiber ceilings, a waterproofer must first be attached directly under the roof. Otherwise, the steam that passes through the slabs will condense on the roof and drain off.
- Do not attach suspensions in front of the corners around the perimeter, only after. This is necessary to align the structure in one plane.
- Be sure to wear gloves. Mineral fibers can irritate your hands, and the tiles themselves can get dirty.
- If, during careless installation of the frame, the size of the cells is violated and the tile does not fit, the frame can be straightened by wedging.
How to install a suspended ceiling - watch the video:
Installation of a ceiling made of mineral fiber plates is not laborious, however, it requires many details. The main thing is to fix the frame correctly, select its elements and fasteners so that the structure does not collapse after a while. It is also important to fix the plates themselves in accordance with all the rules so that the coating looks aesthetically pleasing and even.


