
- Author Arianna Cook cook@women-community.com.
- Public 2023-12-17 14:23.
- Last modified 2025-01-23 09:40.
Microdermal piercing, pros and cons of this jewelry, convenient places for implantation, installation, care of the puncture site, possible problems, consequences of removing the jewelry. Microdermal is one of the newest forms of body jewelry that is safer, more graceful and more accurate than conventional piercings. The structure of the products allows them to be placed in groups at small distances from each other, creating compositions while maintaining convenience and comfort. Thanks to these features, the popularity of microdermals is growing rapidly.
Features of piercing with microdermal

Microdermal is a two-part decorative element. Its base in the form of a small rod is implanted under the skin through a small puncture. The outer decorative part of the jewelry is screwed from the outside onto the base under the skin.
The favorite places for microdermal insertion are the neck and décolleté zones, but this type of body modification can be used to decorate any part of the body. Unlike classic piercings, microdermal jewelry does not interfere with the natural stretching of the skin and rarely injures the epidermis if the puncture site is accidentally touched.
It looks much more neat than a regular piercing because of the place where the earring is attached hidden under the skin. Thanks to this feature, microdermal patterns built on the body do not look cumbersome and oversaturated, but original and organic.
As a three-dimensional element in an ornament, a microdermal piercing can be an extravagant addition to a tattoo.
How to choose a place to install microdermal
The installation of microdermal in specialized salons is a simple and quick procedure, regardless of the place chosen for the original decoration. The process of piercing and setting the earring is the same for all parts of the body. To avoid unnecessary trauma to the skin, microdermals are advised to be installed in areas least of all in contact with clothing or other parts of the body. This allows you to speed up the healing process and skin getting used to the new jewelry. Below is a list of the safest areas for microdermal installation.
Neckline piercing

The décolleté area is one of the most convenient, but not the most successful areas for piercing implantation. There is a high probability of injury to the skin during the healing of the puncture. In this area, you should be very careful when choosing a specific point for microdermal insertion, since there is a risk that the piercing will not take root due to the constant rubbing of the puncture site with a bra.
But even if you choose a place that does not exactly come into contact with your underwear, there is a possibility that the skin will be injured by the base of the earring when rubbing against tight-fitting clothing.
In this area, as in general in all areas of piercing implantation, the most successful place for an earring is the part of the skin that is least of all in contact with anything foreign. Therefore, here microdermal is usually installed above the breast or in the center of the breast (10 centimeters below the collarbone).
Consideration should also be given to choosing a wrap earring for this area. Do not attach too bulky, wide or ribbed decorations.
Microdermal piercing on the face

Of the most common places for the establishment of microdermal on the face, the cheekbones, the center of the forehead, cheeks, and areas near the ears are distinguished.
For such a piercing, you should choose small jewelry that will not interfere with the contact with clothing or hands.
Punctures on the face heal for about two months, and the first uncomfortable stage lasts on average one week. Throughout this time, they must be carefully looked after.
Do not allow creams and decorative cosmetics to get into the piercing site during the entire regeneration period, otherwise microdermal rejection may occur, which will leave behind ugly scars or scars.
Placement of microdermal on the neck

In this part of the body, there are no particular restrictions on the location of the microdermal, but most often it is installed on the back of the neck under the hair.
Usually, in this area, they are not limited to one puncture, but create a track of two or more decorations. Lovers of a large number of jewelry can line up a line of earrings from ear to ear along the very edge of the hairline. This piercing looks unusual and at the same time is not very striking.
Again, there is one "but": you should not install jewelry too close to each other, because it will be inconvenient to care for them. The minimum distance between microderms should be about 7 millimeters.
Another thing to remember is that it will be difficult to take care of a fresh piercing if you have the piercing on the back of your neck. Therefore, get yourself a faithful assistant who will help you in this matter.
Clavicle microdermal piercing

Those who want to stand out from the crowd can place a microdermal in the clavicle area. In this place, there is less risk of harm to the healing puncture with clothes and it is convenient to take care of it.
The jewelry looks very impressive in the dimple between the collarbones: it is somewhat reminiscent of an ordinary pendant, only without a chain. This can perfectly complement a stylish outfit and intrigue others.
Microdermals are also popular, implanted in the hollow above the collarbones or in the dimple under them. Here, in addition to individual jewelry, they like to do paired piercings with the same wrap earrings.
In addition, the collarbone area is a great space for creativity. Here you can build a whole chain of microdermals, which will highlight the clavicles, or make a pattern in the form of a pendant or some kind of geometric figure.
These areas have become the most common and safe places to install this type of jewelry, however, microdermals take root well on other parts of the body. They can be easily placed in the abdomen or lower back, on the arms and in the upper back.
Despite all the safety of this type of body modification, you should not place microdermals in those parts of the body that regularly come into contact with clothes or are injured. Let's not forget that this is still a skin puncture, and the less we act on it, the less risk of damaging the skin and introducing an infection.
How to get a microdermal piercing

Almost any piercing can be done independently at home, but in order to avoid the bitter consequences in the form of blood poisoning, scarring at the puncture site and rejection of the earring by the body, you need to contact a professional master in a specialized salon.
The correct choice of the decoration itself is of great importance. It is important to determine not only the shape and size of the wrap earrings, but also the microdermal material as a whole. If you make a puncture in a special salon, then the master will definitely help you with the right choice.
If you decide to start looking for the necessary jewelry yourself, immediately forget about the concept of "surgical steel", in this type of piercing this material cannot be used categorically. It will not promote comfortable and safe healing of the puncture. The best material for microdermal piercings is titanium with ASTM markings (F-136). It does not oxidize, so the likelihood of rejection by the skin is minimized. The titanium base of the piercing does not cause allergies and helps the base of the piercing to be absorbed better.
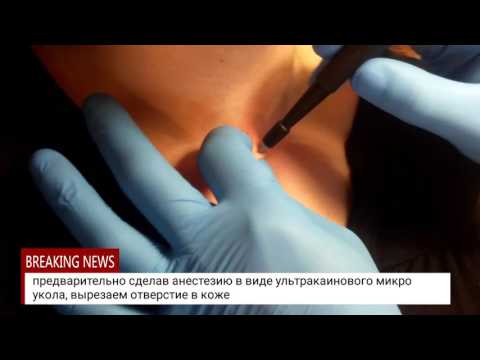
Microdermal insertion is a fairly painless procedure, as it is mainly carried out under local anesthesia. The process of implanting jewelry under the skin takes no more than a couple of minutes, but it is not so easy to do.
Step-by-step instructions for installing microdermal:
- First of all, the skin is thoroughly disinfected with 70% ethyl alcohol.
- Next, an incision is made on the skin with a round scalpel (punch) or a special needle of the required shape, through which the base of the jewelry will be placed.
- After that, under the layer of the epidermis, an incision is made in two different directions: this must be done so that the shape of the hole in the skin fits as much as possible under the framework of the microdermal.
- Then, the base plate of the decoration with a small pin is carefully inserted into the finished hole. It is important to insert it straight the first time so that you do not have to correct it inside the open slot.
- The next step is to screw a decorative earring onto a pin sticking out of the leather.
- Further, this entire structure is sealed with a plaster so that debris does not get into the open wound at the first stages of healing.
Skin care after microdermal installation

At this stage, you are completely responsible for the further "fate" of the piercing. You need to carefully look after the puncture during the regeneration of the skin so that the healing is quick and there are no complications in the future. The piercer will tell you how to properly monitor the microdermal after installation. Let's take a closer look at how to make your piercing as safe as possible in the initial stages:
- The first two to three days after installing the microdermal, the puncture site should be sealed with a plaster.
- For about a week, do not allow a freshly installed earring to come into contact with anything and rub it against clothing. This can irritate the wound and carry dirt into it.
- During the first day, in no case should you wet the puncture site.
- It is advisable to refrain from swimming in open water during the entire healing time.
- It is necessary to treat the puncture with antiseptics daily. To do this, you can use drugs such as Miramistin and Chlorhexidine. Tea tree oil diluted with distilled water is also a good antiseptic. It is important that hands are thoroughly washed with soap and water before starting treatment!
- It is not recommended to change the upper wrap earring until the puncture site is completely healed. It is important to make sure that the puncture has healed and that the microdermal has completely engrafted. The regeneration time depends on the individual characteristics of the organism and usually takes a little more than six months.
At first, it is important to properly care for the new piercing, otherwise the wound will become inflamed and microdermal rejection may begin. As a result, scars may remain, which can only be eliminated with the help of a special operation. Therefore, if you have started rejection of the piercing, you need to urgently contact the master and, no matter how sad it may sound, remove the jewelry from the skin.
How is the removal of microdermal

It must be understood that microdermal is not a decoration for life. Often it is removed after several years of wearing, as they get tired of the piercing or simply begin to consider it not very comfortable.
Removing microderm is not a complicated process, it only takes about a minute. For its implementation, it is worth contacting only a professional master, and it is desirable exactly to the one who installed this jewelry for you.
The skeleton is pulled out of the skin with small forceps, then the skin is treated with an antiseptic. After that, a small wound remains in it, which soon heals almost without a trace.
To keep the piercing mark as invisible as possible, the wound needs to be looked after in the same way as for microdermal in the first days. Namely: disinfect, seal with a plaster and try not to disturb once again.
Will there be a scar after removing microdermal

If the piercing was not damaged while wearing, no scar will remain. Without a doubt, the final result of skin healing depends only on the characteristics of your personal body. The skin may recover completely, or a tiny, almost imperceptible mark may remain.
However, if you had to decide to remove microdermal as a result of its inflammation, the scar will still remain. And in the case when the skin begins to reject the piercing, even an unpleasant scar may remain. Do not be upset if it does not take root, when the puncture site heals completely (7 months), you can install the piercing in the same place.
How to make a microdermal piercing - watch the video:

Microdermal is one of the most stylish and safe types of piercing: the installation of this jewelry is carried almost painlessly. However, you should carefully consider the entire process of implanting jewelry before deciding on this unusual step. It is necessary to understand that this decoration is unlikely to stay with you for a long time, because it quickly gets boring and becomes irrelevant.


