
- Author Arianna Cook cook@women-community.com.
- Public 2023-12-17 14:23.
- Last modified 2025-01-23 09:40.
An article about floor polishing: its tasks, methods of execution, choice of equipment and work technologies. Methods of processing bases made of various materials are considered. Floor polishing is the removal of the eroded outer layer in order to improve the surface quality. This treatment is widely used in the finishing of coatings in many public and residential areas. Large area concrete and self-leveling floors are polished by specialized organizations. During home repairs, many do the work on their own. You will learn about its technology from our material.
Tasks and methods of floor polishing

Floor polishing is the final stage of its grinding. In fact, these are identical concepts, since in both cases the same equipment and technology are used. The only difference is that when polishing, an abrasive material with a finer grain is used than when grinding, and a smaller machine.
Removing the unstable top layer of the floor using special installations solves several problems:
- Small defects are eliminated on the surface, it becomes even and smooth.
- Its degree of adhesion to any building mixtures increases.
- Dirt and remnants of old floor finishes are removed.
- Dust formation on the surface is reduced to almost zero.
- The water resistance of the floor is increased and its appearance is improved.
Floor polishing can be done dry or wet:
- Wet … Provides for the wetting of the surface during its processing. Most often, this method is used in the manufacture of mosaic floors with granite or marble filling. In the finished form after polishing, they have an absolutely smooth and even surface and a decent appearance. The disadvantage of this finishing method is its high labor intensity and rather low productivity, which is caused by wet sludge, which periodically clogs the abrasive elements of the machine. It is quite difficult to remove it in a timely manner.
- Dry … More popular. It allows visual control over the process and does not need time to dry the floor after it has been treated. The only drawback of the dry method is the large amount of dust that forms during operation. This requires connecting an industrial vacuum cleaner to a sander or polisher. Concrete floors are often sanded in this way.
Choosing equipment for floor polishing

Today, buying a device for polishing and grinding the floor is not a big problem. Such equipment has two categories: professional machines and power tools that can be used to process wood, cement and polymer coatings.
Undoubtedly, in terms of quality indicators, professional installations are in the lead. They are equipped with special main and additional satellite discs with diamond tips. During the operation of the machine, the main and auxiliary working elements move in different directions, grind the surface and make it absolutely smooth and even.
When using professional floor polishing equipment, it is possible to regulate the speed of rotation of the discs, the supply of water for wetting the floor, to collect and remove dust that inevitably occurs during such surface treatment. The cost of these machines is quite high, but there are their "budget" options, which differ from professional installations in compactness and the presence of only one working disc with a diamond coating.
At home, the surface can be polished with an angle grinder equipped with an abrasive disc or a diamond-coated bowl. In hard-to-reach areas of the floor, such a tool is even more convenient than professional equipment.
Floor polishing technology
Quite often, sanding and polishing the floor is the final stage of its finishing. After their completion, the treated surface can be put into operation.
Concrete floor polishing

It is aimed at eliminating scuffs, cracks and creating a perfectly flat, smooth and shiny surface. Most often, such a floor treatment is required in warehouses, sales areas and other areas of high traffic, where the coatings are subjected to high mechanical stress.
Polished concrete has excellent abrasion resistance, reflects light, is durable and looks beautiful. If necessary, it can be decorated with various paints and varnishes.
Before polishing the concrete floor, it should be sanded. This work is performed in the following sequence:
- First, the old finish layer is removed from the surface. This can be done using shot blasting or a grinding tool equipped with a 30 grit diamond disc.
- Then all potholes, cracks and expansion joints must be repaired on the concrete floor. An epoxy-based filler is best suited for this purpose. Defective spots after embedding must be aligned flush with the overall floor surface.
- When the putty is dry, turn on the sander and sand the floor with 40-grit discs.
- After that, the floor must be cleaned of dust and a special hardening compound applied to it. Penetrating into the material, it reacts with calcium hydroxide, which is part of the concrete, and forms an astringent on the surface, which closes the pores in the floor. As a result of this reaction, it becomes moisture resistant and more durable.
- Then the surface is sanded with discs with a grain size of 400. As a result of this procedure, the floor becomes resistant to mechanical stress and can now withstand not only intense traffic, but also the driving of heavy forklift trucks.
At the last stage of work, the floor surface is polished by a machine, the discs of which have a grain size of 1500-3000. After the completion of the process, the surface of the concrete acquires a gloss. By using alternately different grain sizes of diamond abrasives, it is possible to obtain a floor of any level of polish, up to a mirror-like state. It is very convenient to wash such a coating with water and a cloth.
Self-leveling floor polishing

The need for polishing or grinding polymer floors arises in the event of a violation of the technology of their device or as a result of surface defects due to improper use of coatings. The processing of such substrates is carried out using grinding machines used for finishing metal, wood and polymers. Concrete polishing equipment is not suitable in this case.
The technology for polishing a self-leveling floor is in many ways similar to the method described above. When performing work, you should use goggles, a respirator and protective clothing, since polymer floors are dry sanded, and the synthetic dust generated during this process is harmful to health.
Some defects of the self-leveling floor cannot be eliminated by any grinding and polishing. These include potholes and chips of the surface, as well as traces of its punching by transport. In these cases, cleaning and priming of defective areas is required, followed by pouring a new coating layer.
Wood floor polishing

This is the most common flooring finish found in home renovations. Therefore, we will dwell on it in more detail.
To polish the floor with your own hands, you will need the following tools, consumables and equipment:
- Grinding belt machine. It can be rented from any of the many organizations that provide this type of service.
- Sandpaper of varying density. Such material can be bought at a construction supermarket.
- Grinding manual machine. It is multifunctional, so it can easily be found in your home or in your neighbors.
- Lindens for the sander. This is ordinary sandpaper, but with special Velcro.
- Varnish, roller and brush for painting the finished floor surface. The varnish can be matte or glossy, it is already a matter of taste.
- Putty for wooden or parquet floors. You need to buy it if there are gaps in the floor.
The main material for grinding and polishing in our case is sandpaper. Before using it, you need to know the marking of this consumable, which determines its purpose.
The marking is located on the back of the sheet and in most cases consists of the Latin letter "P", indicating the density of the paper, and numbers 24, 36, 40, 60, 80, 100, indicating the graininess of its abrasive. P24 sandpaper is the coarsest and is intended for sanding uneven or painted floors, P36 paper is used to eliminate smaller unevenness, and P100 or P80 - for polishing perfectly flat floors.
Abrasive lindens for grinders type machines are sold in sets of 20-30 pieces in each of them. One set is enough for processing 120-150 m2 floor.
Plank flooring and parquet can be polished. The processing of each of them has its own characteristics, but its technology for such coatings is common. Consider the step-by-step preparation and polishing of a wooden floor:
- At the first stage, it is necessary to completely empty the room, remove the baseboards and prepare the grinding machine for work, that is, load sandpaper into it. It should be coarse, as you will have to sand the floorboards to a light state.
- Grinding the board should be done in the transverse direction, and the parquet in any direction, but in this case you should not change the direction. As the abrasive wears off, the sanding paper in the machine needs to be changed.
- After rough sanding, cuts always remain on the wood, now they need to be knocked down. If P24 sandpaper was used during work, it should be replaced with P40 and sanding should be continued, but already in the direction perpendicular to the initial "course". As you work, the cuts will disappear and the floor will look more dignified.
- The next stage of the process is polishing the floor with fine-grained abrasive P80. Before starting the procedure, you need to make sure that the floor is level and there are no cuts on it. If the result of the inspection is positive, you can load P80 paper into the machine and start polishing the surface.
- Sanding the board at this stage is carried out in the direction that was previously chosen for knocking down the cuts. Parquet is polished diagonally from corner to corner. After finishing the work, the belt sander can be turned off; it is no longer needed.
- At the last stage of mechanical processing of the floor, it is necessary to grind those parts of it where the use of the machine was impossible: the corners of the floor of the room, the places under the heating radiators, and others. This can be done with a grinder. When working with it, use linden P40. After sanding the problem areas of the wooden floor, the final stage of its processing ends.
After polishing, the floor is recommended to be cleaned of dust and varnished in 2-3 layers. After it dries, small residues of pile from the board may rise. It is very easy to remove them: you need to walk on the floor surface with used P80 paper, without pressing it hard, then sweep the coating and apply another layer of varnish.
Advice! When polishing the floor with a hand sander, there is no possibility of collecting dust. Therefore, you will need to have safety glasses and a respirator with you.
Polishing marble floor

Before starting polishing, it is necessary to assess the condition of the marble floor. He will need such treatment if small damages appear on his slabs or their surface becomes cloudy. If all this is the case, further actions are as follows:
- At the initial stage, you need to perform a rough leveling grinding of the floor surface. This procedure will eliminate small slab height differences and make the seams of the marble floor less noticeable.
- If the surface has mechanical damage in the form of chips, deep scratches or gouges, they must be repaired. To do this, use a mixture that includes polyester glue. With the help of pigments, such a substance can be given a color shade of the treated surface. With its correct selection, the embedment sites will look like natural inclusions of marble.
- After the adhesive has dried, sand it with a fine-grained abrasive material.
- Finishing the surface treatment of the marble floor is polishing, during which special agents are used. These can be performance polishes in the form of liquid wax, which protect the marble coating from damage and help it maintain its shine. In addition, there are compositions in the form of pastes of a thick or liquid consistency, which impart additional properties to the marble surface, for example, an anti-slip effect. Sulfur and finely ground iron oxide are often used for polishing. This mixture is applied to the floor and rubbed with a piece of leather.
To give the marble a mirror-like shine, crystallization of its surface is performed. Previously, to protect a thin layer of polishing from further exposure to chemicals, it is burnished. The processing of the marble floor is completed by applying a polymer composition to its surface. After that, the coating gets water-repellent properties.
Floor screed polishing

Such surface treatment in the future will make it possible to apply impregnation and varnish on it, as well as ensure their adhesion to the base. For polishing, it is recommended to choose crushed granite or marble chips as a filler for the mortar used for screed construction. After sanding the floor, they will create beautiful blotches on the surface.
The screed can be polished 10-20 days after installation. The coating must be completely dry before this procedure. Further processing of its surface is carried out in the following order:
- Work should begin by checking the quality of the screed. It should not have large cracks and reinforcement protruding beyond the surface, which, during mechanized grinding, can damage the equipment. The strength of the screed must be checked by tapping. If problem areas are found, it will have to be disassembled and redone.
- Large cracks in the floor should be repaired with a cement mixture, and then the problem areas should be leveled and sanded. If there are bumps and depressions on the surface of the screed, the grinder must be equipped with additional discs.
- With mechanized floor processing, the voltage in the electrical network must be sufficiently stable, this will ensure uninterrupted operation of the equipment. The voltage check is carried out with a special tester, it is worth doing it.
- Before grinding, the screed must be treated with a special hardening compound, which forms an astringent mineral substance on its surface, which closes the pores of the coating. As a result of this process, the strength of the screed will increase.
- After completing this procedure, you can begin sanding the floor surface. The discs used by the machine in the coating process must have an abrasive grit of 40.
- The final stage of grinding is surface polishing. To perform it, you need to take discs with a grain size of 2000-3000. After finishing polishing and obtaining a smooth surface of the floor, it can be covered with polyurethane varnish in several layers. This will give a glossy finish.
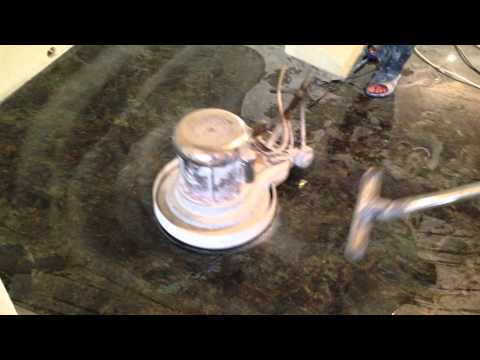
How to polish the floor - watch the video:
The polishing process is quite simple and does not require any special building skills. The professional equipment used for grinding the floor is quite expensive, but at home you can successfully use an ordinary manual grinder instead. It will also help you achieve an impressive floor polishing result that will delight your family for a long time. Good luck!


