
- Author Arianna Cook cook@women-community.com.
- Public 2024-01-12 17:55.
- Last modified 2025-01-23 09:40.
Transform the radiator by making it a false fireplace, sleeping place. Decoupage batteries, decorative screen will turn this heating device into a work of art. Anyone wants their home to be well-groomed and beautiful, but not everyone has the financial opportunity to buy the necessary furnishings. Over time, batteries lose their original appearance, but they can be renewed and given a unique look.
DIY decorative radiators

There are several ways to transform this heater, these are:
- decoupage;
- painting;
- decorative screens;
- pasting;
- disguise behind a false wall.
Painting your battery is one of the easiest ways to renew your battery. And now there are new methods that will allow you to achieve interesting effects.

With such an interesting bronze tint, it will turn out as a result, it will look like an object made of noble metal. Before you start working on the conversion, you need to prepare:
- gauze;
- rubber gloves;
- acetone;
- black and red paint in a can or gold in a spray can.
If the battery has not been painted before, it must be pre-treated with an alkyd primer. If there is rust on the heater, it must be removed.

Further, the surface to be treated is degreased with acetone; you can also use a blowtorch for this. If you want to paint the battery, so that the paint will lay down in a thin layer and evenly, take a rectangle of fur, fold it in half, sew two sides. You will end up with a kind of bag. Put it on your hand and paint the battery with pleasure.
To get a beautiful bronze color, you need to mix black and red paint. If you wish, use a spray paint to decorate the battery.
If you have artistic talent, then transform this heating device by painting something suitable here. See how cute these pencils look, each of them is made on a specific section of the battery.

If you have a modern radiator, turn it into a small piano by painting the keys here.

If you want to cheer yourself up, then use paint in several colors. To have smooth transitions, you can mix color additives with white paint, change the consistency. This will give you lighter and darker shades of the same color.

This option and the other is suitable for those who are not confident in their artistic abilities. Draw white and black stripes on the bulging parts. Cut the tail out of cardboard, paint it, pin it in place and you have a zebra. If you want to go even further, make the head of this animal out of cardboard or plastic, decorate, attach to the side of the battery opposite from the tail.

If you have a modern battery that needs a refresh, then take:
- acetone;
- stickers;
- scissors;
- soft cloth.
Degrease the surface of the washed and dried battery with acetone, then attach the sticker of your choice to it. If it's big enough and echoes your idea, then use the entire sticker.

In this way, the decor of the heating battery is performed. You can turn it not only into a blooming oasis, but also into a cozy fireplace.

Perhaps for some, the radiator will become an imaginary cellar for storing wine.

Thus, you can decorate the battery in the nursery using large or small stickers.

But if your heating radiator is made of cast iron, this method of transforming it may not work, since the surface is uneven and voluminous. In this case, it is better to repeat the following idea.
You can use stickers to turn the battery into a musical instrument. If you have an unnecessary button accordion that has torn furs, you can embody another creative idea, glue one and the other part of the keyboard to the radiator.

Battery decor using decoupage technique
This option is also suitable for those with durable cast iron batteries. Here's how to make decoupage in this case. Take:
- decoupage cards;
- acrylic paints;
- sandpaper;
- decoupage varnish;
- PVA glue;
- brush;
- light enamel.
Using sandpaper, smooth the surface of the battery without trying to remove the entire layer of paint. Now you need to wash the radiator, wipe it dry. In the next step, paint it with white enamel.

Enamel has a strong specific odor, so work in a ventilated area. It is even better if you cover the respiratory organs with a respirator. While the enamel is drying, cut out the decoupage cards so that each piece covers a part of the radiator. After the paint has dried, glue the prepared parts using PVA mixed with water.

If you want, leave the shaded parts (not decorated with a blend) light, cover them with white acrylic paint. You can use the same shade as in the picture, in this case, blue acrylic paint was used. When any of these solutions is completely dry, cover the radiator with 2-3 coats of varnish, letting each of them dry.

You can use napkins for blending, decorate the heating device with them.

For this, only the top layer with a pattern is taken, glued to a pre-painted, dried battery. After the glue has dried, in order to fix the decoupage, you need to cover the radiator with a couple of layers of varnish. But you need to choose one that will withstand the strong heating of the heater.

If you want to give the batteries a chic look, so that they look like old ones, then use a self-hardening mass and a stencil to apply a drawing. Then cover with paint. Such stucco molding will firmly adhere to the battery, as it adheres well to similar metal surfaces.

The next type of decorating a radiator is making a screen for it. Moreover, you can buy a decorative panel, there are those that are inexpensive, and make a box for it with your own hands.
Making a screen for battery decoration
Before you start making it, prepare it:
- waterproof plywood with a thickness of 2 cm 2 mm;
- paint;
- a board of painted plywood, fine wood chips or edged board;
- connecting elements 50x32 mm in size from pine;
- brackets;
- joiner's glue;
- screws;
- wooden plugs dowels.
First, determine the dimensions of the battery by knowing its height, width, and depth.

So that the room does not become cool during the heating season, when installing the screen, it is necessary to provide for the warm air to circulate freely. To do this, a space must be left between the battery and the screen.

Determine the size of the panels. You already know the width of the radiator, and if its height, as in the figure, is 72 cm, you need to add 8 cm for air circulation, so the height of the vertical panel will be 80 cm.

If there is a temperature adjustment in the radiator, or a pipe fits here, then you need to determine where these components are located, in order to then make cutouts in the border of the screen at this place.

Now you need to attach connecting elements to the vertical wooden sides using wood glue and wooden plugs or screws, which are the bars.

Attach the top panel to the sides.
If you make the front panel yourself, then use a horizontal strip 18 cm wide and two vertical ones 12 cm wide for this. They are attached to each other with holes and dowels.

See in more detail how to prepare panels for this. First, mark with a pencil where the end holes will be. On another board, you need to do them at the same level. Pour wood glue here, insert the wooden plugs first into the holes on one side, then attach the second board. To secure the attachment point, carefully pull the two boards together, lightly tapping first on one, then on the other with a rubber mallet.

In the same way, you will attach four horizontal cross members using dowels and holes. Note that 60 mm wide gaps are left between the cross members for air circulation. You can make adjustments to these parameters or make the screen for the battery more fanciful, for example, stuffing battens here in the form of a crate.

You have determined in advance where you need to make cutouts in the sidewalls. Use the drill bit to do this part of the job. To make the hole smoother, after cutting it out with a hole saw, cut it with a hacksaw.

To install the battery shield, you need to provide it with support bars. First, they are fixed inside the screen at the top. Then you need to determine the place of attachment of the support strips on the wall, above the battery.

Determine the length of the support bar, remember to leave room for the temperature control valve. If it is on the side, then leave a distance of at least 18 cm so that the support bar can move freely. If you wish, you can use a magnetic mount instead of such a mount.

If you assemble the box yourself, and you already have a decorative panel, then the screen for the heating battery may look like this.

To buy a false fireplace or do it yourself?
This question invariably arises for those who want to create the atmosphere of a country house in a city apartment. In this case, you can "kill" two birds with one stone, not only create such a piece of furniture, but also hide an unsightly battery. Not everyone has it under the windowsill; for some, this heating item is mounted almost in the most prominent place of the room.

See how such an unsightly sight can be turned into a cozy, almost fabulous corner. This will require some materials, these are:
- plywood with a thickness of 9 mm;
- wooden layout;
- bars with a cross section of 50 mm;
- self-tapping screws;
- a fragment of a garden fence;
- construction glue gun;
- decorative plastic panel showing brickwork;
- furniture stapler;
- stain;
- polyurethane skirting boards;
- putty;
- fine sandpaper;
- acrylic paint;
- brush;
- long lamp;
- stones for a bath.
All this will help a truly magical transformation, because very soon you will have an imitation fireplace instead of an unsightly battery.

Mark the location of the front of the fireplace. Cut a rectangular hole in the center of the plywood.

Using a furniture stapler, attach the decorative panel to the center of the portal, finish it with a wooden layout, attaching these elements to a glue gun.

Paint the furniture board with wood stain, when it dries, attach it using self-tapping screws as a shelf on a false fireplace. Glue the polyurethane skirting board to the plywood-floor junction and up. If they do not hold well here, then additionally secure them with self-tapping screws. You will close these places with a putty, when it dries, gently walk with fine sandpaper.
If it happens that there is no putty on the farm, you can replace it with a sealant or liquid nails. After these soft materials have dried, smooth the surface with sandpaper.

Now paint the fireplace portal with the first coat of white acrylic paint, when it's dry, apply the second.

To simulate fire, place a long lamp in the firebox so that you can plug it into a power outlet. Nearby, closer to the viewer, you need to put stones for the bath. It remains to attach one more element - this is part of a decorative garden fence, in this case, it will perform the function of a metal lattice. In this case, you can even use a plastic fence, covering it with metallic or golden paint.
This is how unusual and very stylish a do-it-yourself battery decor can be.
This option is suitable for those who are heavily heated in winter. In such a room it will not be cold, the battery is closed, but warm air will escape through the rear side vents. But if the boiler room does not work 100%, in the cold season you cannot do without a hot battery, then do not close it almost completely, as in the above option. The following idea will work for you.
To implement it, you will use:
- drywall;
- metallic profile;
- self-tapping screws;
- drywall knife;
- putty;
- white and gold acrylic paint;
- sealant in a tube;
- construction gun;
- polyurethane skirting boards and glue for them.
Manufacturing instruction:
- As in the first case, cut a hole in the drywall sheet. Make a base from a metal profile, attach a drywall blank to it with self-tapping screws. Make a rectangular shelf from the same material, which will become the top of the false fireplace.
- In this part, you need to connect the front and top elements, gluing polyurethane skirting boards here in the front and two small ones on the sides. The same parts need to be attached between the floor and the drywall sheet below.
- Put a sealant in a construction gun, feel like a real sculptor, as now you will be making various monograms on the top of the fireplace. If something does not work out, remove the excess until the composition has frozen. The end of the extruded strip will be straight if you just cut it off with scissors.
- Allow the sealant to cure well. Now paint the fireplace portal with white acrylic paint in two coats. When it dries, take a thin brush, use it to paint the monograms with golden paint. If you want to decorate the top of your fireplace, you can use a laminate board for this.
- Of course, the battery must also be painted with a suitable color.

By making a plasterboard fireplace portal, you can show your imagination. The inner hole does not have to be cut rectangular; it may have a slightly different shape.

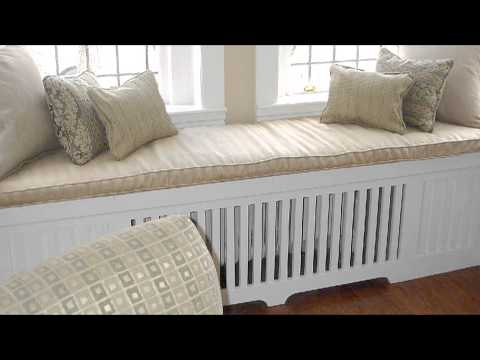
If desired, you can perform not only the decor of the battery, but at the same time turning this part of the room into a comfortable table or bed for a cat. After all, these animals love to take a nap in the warmth, lie on the windowsill.

To implement this option for decorating a radiator, take:
- thick sheet of foam rubber;
- dense fabric;
- drywall;
- polyurethane ceiling plinth;
- drywall saw;
- acrylic paints;
- metallic profile;
- self-tapping screws.
Then follow this instruction:
- From a metal profile, assemble a rectangular base, using self-tapping screws, attach it to the sides to the wall, from above to the window sill, and from below to the floor.
- Now, again using self-tapping screws, you need to attach a drywall sheet to this metal base, of course, you first need to cut out such windows or smaller in it. It is necessary to glue the plinth on the top of the drywall, and then paint this decorative element with white acrylic paint.
- Cut a sheet of foam rubber to the size of the window sill, sew a thick fabric cover onto it. Insert the zipper on one side so that you can remove this part of the mattress and wash it. Rollers can also be made of foam rubber. To do this, you need to connect the small edges of the rectangle, the slopes with a roll. A pre-sewn cover is put on top.
This place of the room can still be turned into a table.

If you attach shelves of wooden planks to the side, then you can store newspapers, magazines and other small things here.

Here's how, if you wish, you can decorate the battery, turning this not always attractive element into an object of your joy and pride.
If you want to see some examples of how to convert a radiator and a window sill into a sleeping place, bench, table, then watch the following video selection.
If you want to carefully study how to decoupage a battery, then the following review is especially for you.


