- Author Arianna Cook cook@women-community.com.
- Public 2024-01-12 17:55.
- Last modified 2025-01-23 09:40.
Learn a series of effective exercises at home to help you develop enough spine flexibility for a bridge. For many residents of modern cities, the spinal column works very little and in most cases only plays a supporting role. This leads to weakening of the cartilage. In addition, the ligaments can grow excessively and as a result, the mobility of the vertebrae will sharply decrease.
If you cannot bend forward and reach the ground with your hands, or bend backward when you see a wall, then you should definitely engage in special exercises that increase the flexibility of the spinal column. Otherwise, you may soon start feeling back pain. In this regard, you should learn how to stand on the bridge. This gymnastic exercise will greatly improve the flexibility of the spinal column.
To find out the degree of flexibility of the spine, you should fix the mark on the wall (door), placing it at the level of the shoulder joints. After that, you need to perform two movements:
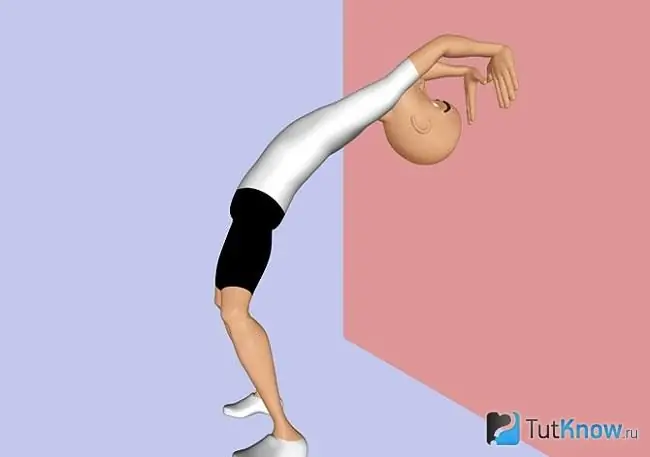
- Take a standing position with your back to the established mark at a distance of one step. After that, start bending back and try to see the mark.
- Turn to the mark with your left side and raising your straightened left hand, try to touch its mark. Run the other way.
If you can handle these tests with ease, then your flexibility is at a high level. If you have a hard time doing it, then the flexibility is average, and when you cannot perform the movements, then it is poor.
Warm-up exercises in preparation for the bridge

Below we will tell you how to get on the bridge, but before that you need to do a good warm-up to prepare your body.
Exercises for the shoulder girdle
- Perform rotational movements with extended arms back and forth.
- Bend one arm at the elbow at the level of the chest, while placing the forearm parallel to the ground. If you bent your right arm, then begin to rotate the body to the right, while twisting the spinal column. After that, repeat in the other direction, changing hands.
- Bend your arm at the elbow and lift it up, placing your forearm behind your head. Begin to pull with the other hand raised down, and after completion, repeat the exercise in the other direction.
- Bring your straight arms down and join them in a "lock". Then lift them up, at the same time arching in the back and shoulder girdle.
Exercises for the lower back and shoulder girdle
- The palms are on the hips. Begin to bend back, throwing your head back.
- While tilting the upper body forward, simultaneously stretch your closed, straightened arms parallel to the ground.
- Close your hands and begin to tilt your body forward to parallel with the ground. Wave your straightened arms above the level of the back of your head, tilting your torso forward and touching the ground with your hands.
- The palms are on the back of a stable chair or the bar at the waist level, and the legs are straightened. Bend the spinal column as low as possible.
Exercises for back muscles
- Legs and backs should be straightened and in this position begin to perform circular movements with the upper body.
- The legs are straightened and located at the level of the shoulder joints. Bend to the sides and at the same time straighten the upper arm parallel to the ground.
- Get into a position on all fours and begin to arch your back up and down with the maximum possible amplitude, imitating the movement of a cat.
- Without changing the starting position, imagine that there is a crossbar in front of you not far from the ground. Perform a movement as if crawling under this bar.
- Take a prone position with your palms interlocking at the back of your head and bend your upper body in the lower back with maximum amplitude.
- Without changing the starting position, stretch your arms forward, while closing your palms. Roll from your hips to your chest and back.
- The starting position is similar to the previous movement, but the palms rest on the ground. Begin to bend your lower back, throwing your head back.
- Take an emphasis on your knees and begin to swing your leg, while bending in the lower back.
The most common mistakes when running the bridge

We will now cover the most common beginner mistakes, and then you will learn how to make a bridge from different positions. When the shoulder girdle does not have sufficient flexibility, the main support during the bridge is on the legs. This is a very unstable position, as body weight is unevenly distributed. Also, in this case, the feet and palms are located far enough from each other and this increases the load on the muscles of the limbs.
When the bridge is correct, the limbs should be perpendicular to the back. To increase the mobility of the spinal column when performing a bridge, it is necessary to straighten the legs and arch the back. You can also swing slightly alternately in the direction of the palms and feet. As the mobility of the spinal column increases, you should gradually decrease the distance between the feet and palms.
What is the correct way to stand on the bridge while lying down?

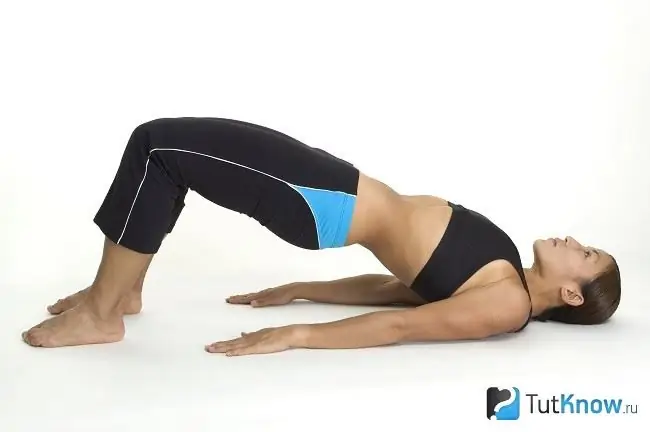
Lie on your back and place your heels in the buttocks area, bending your knees for this. The palms are on the ground slightly above the shoulder joints, and the fingers are directed towards the body.
Straining your leg muscles, begin to lift your pelvis. After that, it is necessary to bend in the back, straightening the legs at the same time, as much as possible. Returning to the starting position, the shoulder blade should first touch the ground, and then the buttocks. Perform the movement several times.
How to stand on the bridge while sitting?

The legs should be bent at the knee joints, the back should be straightened, and the feet should be on the ground. Place the palm of your right hand on the ground and rotate the body slightly. Start lifting your buttocks off the ground, leaning on your legs and right arm. After that, describing an arc with your left hand, place your palm on the ground and stand on the bridge.
Returning to the starting position, all movements should be performed in the opposite order. As the flexibility of the spinal column improves, it will be useful to master the flip from the bridge position:
- The upper part of the body must be turned to the left, moving the right hand behind the left. After that, you need to place your left leg behind the right. As a result, you will find yourself in a position where your back is directed upward, and you rest on your palms and feet.
- To return to the bridge position, you must simultaneously attach your right leg and arm.
Having mastered this movement, start working on the flip to the other side.
How to stand on the bridge in a standing position?

If you have mastered the technique of performing the bridge in the lying and sitting positions, then you can learn how to stand on the bridge while standing. This is the most difficult exercise and requires good preparation. At first, you can train at the Swedish wall or just near the wall.
Stand about 80 centimeters from the wall with your feet at the level of your shoulders. After that, begin to bend back until you touch the wall with your fingers. Continue to bend over, while fingering your fingers along the wall. As a result, you should stand on the bridge. Work against the wall until you master the technique of performing the bridge in a standing position.
After that, you need to stop using the wall and for this you should use a mat. It will also be very good if you get insurance. It is necessary to face the person who insures you, placing your legs at the level of the shoulder joints. Start raising your arms, and at this moment your friend can already begin to hedge you, holding you under your back.
Leaning back, it is necessary to maintain a second pause at the end point of the trajectory and, eliminating sudden movements, stand on the bridge. To return to the starting position, you should push off the ground with your hands and straighten up. Do not give up on safety net until you have fully mastered this technique.
Very often, when performing a bridge in a standing position, the same mistake is made - a movement is performed with the back and shoulder joints. You only need to move your arms to make the bridge. Also, often the bridge is performed only due to the movement of the back and the shoulder girdle does not participate at all in the work. As a result, you will not be able to fully extend your arms, and this will significantly reduce your stability.
How to properly warm up and make a bridge, you will learn from this story:


