- Author Arianna Cook cook@women-community.com.
- Public 2024-01-12 17:55.
- Last modified 2025-06-01 07:38.
Having learned how to make shoes with your own hands, you can sew summer shoes, warm slippers and even dump your own wool boots. It will be in your power to paint both men's and women's shoes. Make your wildest dreams come true by creating shoes or decorating store-bought ones.
How to decorate your wedding shoes with your own hands?
You can turn even the simplest ones into wonderful shoes if you show diligence.

To do these, you will need to take:
- shoes;
- lace or guipure;
- rhinestones;
- hard tulle;
- acrylic paint;
- threads with a needle;
- acrylic contour;
- universal colorless glue;
- glue gun.

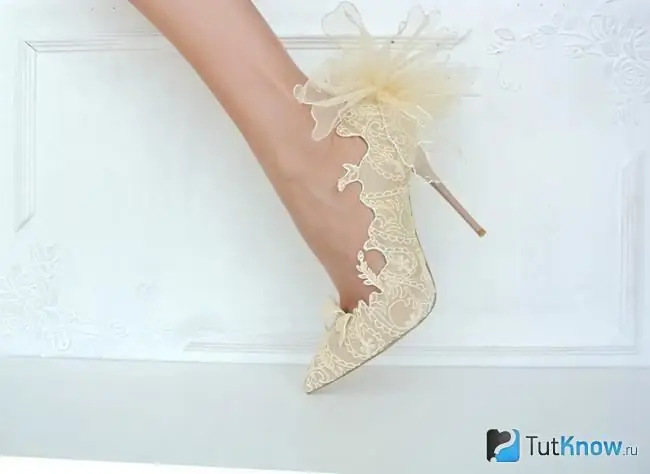
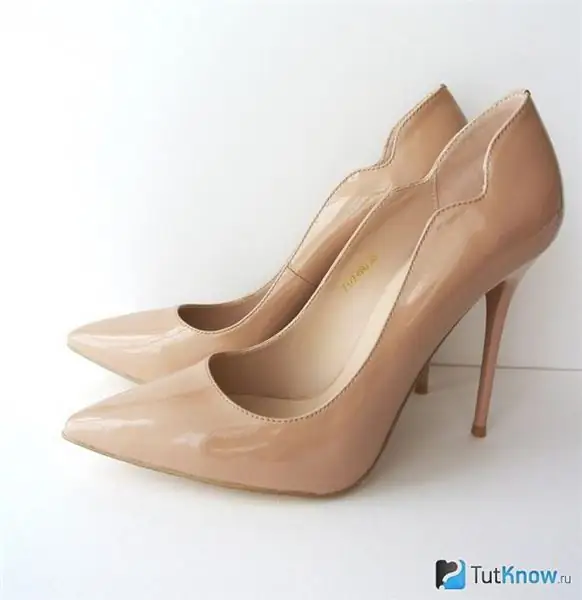
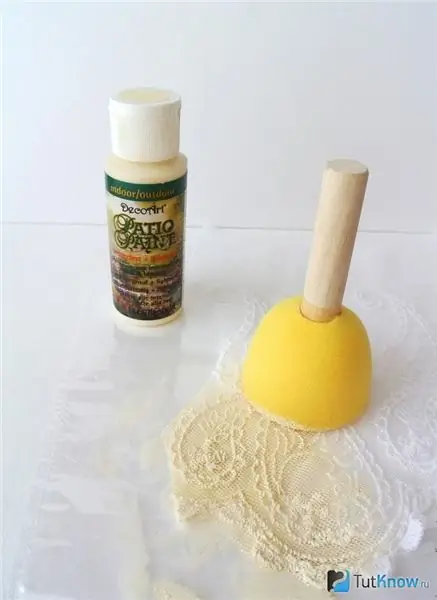
See how the shoes were in the beginning. As you can see, the model is very simple and not suitable for a wedding. See how to make your shoes more beautiful. With your own hands, you have to paint tulle and guipure with beige acrylic paints using a brush or sponge.

If, for example, you want the finished product to be pink, then take paint of this shade. Now attach a piece of lace fabric to the shoe. Lubricate the outside of the shoes with transparent glue that is water-repellent. Then cut off the excess material between the shoe upper and the sole.

Also glue the guipure fabric to the heel only on one side for now and cut the fabric at the seam.

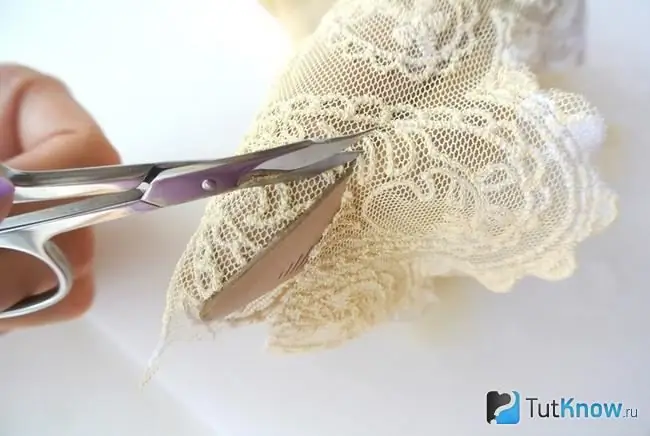
Now you need to glue this lace fabric on the other side of the shoes. It is necessary to cut off the excess in the middle of the shoes and select the patterns with scissors.

When gluing guipure, stretch it slightly so that it lies well on the surface of the shoes.
Tighten the edges of the lace with matte varnish.

Now you need to process the cuts with an acrylic outline and decorate the wedding shoes further. To do this, cut a piece of linen 20 by 40 cm from tulle and collect it on a thread with a needle just below the middle.

Using a hot gun, attach the tulle bow to the heel so that the smaller part is facing the heel, and the larger part is facing up.

To make the bow more magnificent, make a second part of tulle for it. Decorate it in the same way, gathering it on a string almost in the middle.

You also need to sew this part from the heel, but not vertically, but horizontally. Go over the cuts with an acrylic outline to stiffen and decorate.

It remains to glue some rhinestones on the wedding shoes and you can put them on the legs.

Here's how to decorate your wedding shoes with your own hands. Fully designing shoes is just as fun. Watch a master class that teaches this.
How to sew slippers quickly?

The pattern made on thermal transfer will greatly simplify the work. But if you don't have one, you can take a regular one. Here's what you need to create indoor shoes:
- pattern;
- felt;
- cork sheet;
- glue moment "Crystal";
- scissors;
- iron.
See how you need to transfer the pattern on the thermal transfer to white felt. Place the pattern on the felt and heat up the iron so that it can iron the cotton fabric. Now iron the pattern with it.

Here's how to make DIY homewear shoes next. You will iron the pattern with an iron, heating it well so that all the details are sealed on the fabric. Now you need to cool the structure and remove the top sheet in the box.

You see how well the drawing should be transferred to the fabric. Now cut out the details of the slippers, not forgetting to leave small allowances for the seams on all sides.

To keep the slippers well in shape, make the tops for them double. To do this, you need to attach these parts to the felt and cut this dense fabric using this template.

To sew the slippers to your size, place your foot on a piece of paper and outline it. But at the same time, you need to make a good supply. You can use any slippers convenient for you as a template.

It is better not to cut the insole yet, but to sweep the top of the slippers to it when the insole is on the sheet.

Sew over the basting on the sewing machine. The insoles can now be cut.

Make the sole of the slippers from a sheet of cork. To do this, you need to glue the insole to this material.

Cut the outsole with an allowance and attach it to the insole with paper clips on all sides so that the two materials adhere. When this happens, remove these clips and cut the slippers to fit the insole.

Now you can flaunt them around the house. If your apartment is cold in winter, then warm shoes will certainly come in handy. You will learn how to create it right now.
How to knit slippers?

They will turn out to be so original, like pieces of cheese, into which mice have made their way. For work, take:
- 200 g of yellow merino wool;
- 50 g gray wool carded;
- yarn for tying;
- mesh;
- bamboo mat;
- hook;
- vinyl gloves;
- template for the backing;
- massage roller;
- soapy water;
- film;
- spray;
- beads;
- towel.
Draw your foot on a piece of cardboard or paper, enter the resulting sketch so that you get a solid continuous line. Place this blank on the template, add 5 cm on each side. Now circle and cut. You will get small blanks. Spread yellow wool on them, straightening it, all you need to place here is the 4th layer of such light yellow wool.
Spread that vertically, then horizontally, thus alternating the rows.
Make 1:10 soapy water, pour it into a spray bottle and spray the wool blanks.

Cover the future slippers with a net and start rubbing them in with a massage roller. In this case, your hands must be in gloves.

When the coat is thick, complete this process. Turn the blanks over to the back side, fold the wool and lay out 4 layers of wool here, alternating vertically and horizontally. Also cover the blanks with a net and roll them with a massage roller so that the wool is matted.

Now you need to lay and roll on the bright yellow wool on both sides.

Be patient and roll the wool about 100 times on each side. Moreover, it should be well matched. Then make cutouts in the slippers and take out the template from them.
Blot off excess liquid with a towel by placing a slipper on it and rolling this structure into a roll. Now roll this piece for a long time, and you will see that the sneakers will become smaller in size.

Here's how to make DIY shoes for your home next. Again you need to moisten with soapy water and beat with a hammer to beat off the meat from all sides. Beat them with your hand, rub against the bamboo mat so that the wool fibers fall off evenly. Now rinse the slippers in water and dry them with a towel, rolling them up.

Get some rest and start cutting round holes in your slippers. In this case, you need to capture only the upper bright layers so that the lower light yellow is visible. Wet your slippers again and roll them in a towel.

Beat these blanks with a hammer, at the same time shaping the socks and heels. Here's what you should get by now.

Now you need to dry these soft home shoes in a warm place for 24 hours. Once the felt is dry, you can sew on the leather sole. To do this, cut it to fit the bottom of the slippers, cut out and sew to them with a seam "over the edge".

Tie them with yellow thread at the top in a circle. To do this, you can make a small hole with a hole punch or take a sturdy needle and carry out the procedure with this tool.

Dump a family of mice out of yellow wool using gray wool and a dishwashing sponge. Make the lower parts of the ears, noses from pink wool, and use beads as eyes, which also need to be sewn into place.

See what fun slippers you end up with.

If you enjoyed felting with wool, then check out how to make outdoor shoes that are just as warm and cozy.

To make such beautiful ankle boots, you need to prepare:
- 240 g of plain Latvian carding or 120 g each in two contrasting colors;
- a flap of the backing under the laminate;
- pattern of slippers;
- long ruler;
- a shoe or your own leg for fitting;
- felting tools such as: sponge, garbage bags, gloves, soap, bubble wrap.
First you need to find the source, which consists of a sole and an instep support or a sole on the platform.

To make shoes, you will need a pattern of ballet slippers. This one is designed for size 37. If you have it a little more or a little less, then you can slightly modify this pattern.

To better know the labels of this pattern, look at what the numbers in the designations are equal to:
- One - 37 cm.
- Number 2 means a distance of 10-11 cm.
- 3 is 20 cm.
- 4 is equal to 16 cm.
Take the color you want and start laying it on the pattern made from your laminate backing.

Sprinkle the decomposed wool with soapy water, cover it with plastic wrap, and start felting with your gloved hands. Now carefully flip this blank over to the other side. Fold the edges of the wool up and also weld the wool here to cover the entire surface of the felt boot.

On yellow wool you need to lay brown. Roll it in this way on both sides.

Now you need to properly dump the workpiece. If you have a sander, this is a great tool to help you make shoes.

If there is no such device, when you put a bubble wrap on top of the shoe, roll it all into a roll, wrap it in a towel and roll it with a rolling pin.

You need to roll this roll on each side 50 times, then unfold it and get the patterns. You will use them next time if necessary, so don't throw them away.

Treat the seams especially well. Now place these blanks in a garbage bag and you can throw away your negative energy. After all, now you will need to knead these felt boots like dough.
Press lightly at first, but then act more confidently. In total, you need to press the bag a hundred times, do not forget to periodically smooth these felt boots.
When you need to finish this manipulation, you will understand. The felt boots will begin to become harder and stiffer. Then you can make the first fitting by putting them on the last or on the leg.

If you have good glue and skills, then try gluing the resulting boot to the platform yourself. If not, get the help of a shoemaker. It can not only glue, but also sew the top to the bottom.

When this stage is completed, you will need to outline the places where you will make the cuts. Create them and you can carry out the final fitting.

This way you can create boots of different styles and colors on the platform. If desired, label them or sew on lace that needs to be folded.

All of these models are great for girls and women. In order not to bypass the attention of your men, study the following master class, from which you will learn how to make leather shoe decor with your own hands. You transform the surface of the boots by applying contrasting paints here.
How to decorate shoes for men?

If you want to please a dear person, then you can present him with these shoes. But look how they were in the beginning.

In order for them to change so dramatically, the following manipulations will need to be performed.
- Clean your shoes first. To do this, you need to walk over them with a brush, and then with a cloth soaked in solvent.
- Wait 20 minutes for the shoes to dry. Now you need to cover it with the main tone paint. Apply it with a sponge, brush, or airbrush.
- Wait for it to dry for 20 minutes, then apply a second coat if the tone is too light.

For dyeing men's boots, SAPHIR leather dye is perfect, so it's best to use it. For the first tone, take a lighter paint, and then apply the darker one along the seams.

Arm yourself with a sponge, paintbrush, or airbrush to soften paint tones with them.

Now apply the cream on the skin of the boot and after 20 minutes polish to a shine. Finally, you can apply a special wax designed for shoes to the boots.
If this is your first time doing this kind of transformation, then it is better to practice on old shoes or a new bag. When you succeed, then you can move on to more expensive boots.
Of course, this way you can decorate not only men's but also women's shoes.
How to dye your shoes at home?

You see, they were a little boring, monochromatic, black. With the onset of spring, I want brighter colors, so transform these by taking your shoes:
- ordinary black shoes;
- acrylic sky blue paint;
- brush;
- a jar of water;
- glossy varnish;
- alcohol.

Alcohol will be needed in order to degrease the surface of the shoes. You can also use gasoline for this. Clean all dirt from all shoes and degrease their surfaces. Paint the shoes with blue paint in the indicated areas. Try to be careful not to stain other areas of the shoe. If this happens, wipe off the paint immediately. When the first layer is dry, paint the shoes a second time, but for this take a paint slightly diluted with water, this will lie smoother.
See how the once and twice dyed shoes look. Of course, the difference is visible.

Wait until the paint is completely dry, then cover the surface of the shoes with a glossy varnish.

Here are such funny shoes instead of boring black ones.
If you like the idea of transforming and creating shoes, then check out another master class.
How to make shoes with your own hands - we sew summer slippers
First, you will need to redraw the pattern presented. It consists of 2 parts.

The first detail is the bottom of the strap shoes, and the second is the top.
Attach each pattern to the suede. In total, you need to make two blanks of each type, but always in a mirror image.

To make the legs comfortable, you need to sew such oval details to the place of the grooves of the sole, under which you put the foam rubber. Determine for yourself exactly where they should be located. To do this, put your foot on the suede and mark these places.
To connect the parts, you will need to make holes in them. On the top they will be 5 mm in diameter and 5 mm from the edge. For large parts, the distance from the edge is the same, but between the holes it is larger, 7-8 mm. The number of holes for blanks of the first and second types is the same.

Here's how to make this type of shoe next. Be sure to arm yourself with very strong threads and start sewing the parts. You can see the technology of this stage in the next photo.

Here's what you should get.

You need to sew elastic bands to the straps on the heel, for the right and left legs. Adjust this piece by yourself to fit the shoe.

Now you can put on these slippers and be glad that in the heat you will not be hot in them.
Here are how many ideas on how to sew slippers and decorate shoes with your own hands were presented to your attention. We suggest watching a video on this topic. The first plot will teach you how to sew ballet flats.

Video number two will reveal the secrets of how to decorate shoes with your own hands. As a result, you will have wonderful gold shoes.


