- Author Arianna Cook cook@women-community.com.
- Public 2023-12-17 14:23.
- Last modified 2025-01-23 09:40.
Polypropylene plumbing device. Development of the highway project. Construction assembly tools. Welding the pipes.
Installation of a water supply system from polypropylene pipes is a sequence of operations for assembling a highway in a house or in a house area. The unique properties of the products make it easy to assemble the structure even for an inexperienced user. We will look at how to do this in this article.
Features of the design of a water supply system made of polypropylene pipes
Water supply from polypropylene pipes is collected in the form of a multi-branch structure, through which the liquid flows to the point of consumption. To create it, you will need pipes and special parts for connecting individual pieces - fittings, also made of plastic.
When choosing pipes, pay attention to the material from which they are made. The area of application of the products depends on the type of polypropylene.
| Pipe material | Application | Dignity | disadvantages |
| PP-N single-layer pipe | For cold water | High strength | Low temperature resistance, high thermal expansion |
| PP-B single layer pipe | For cold and warm water | High strength and heat resistance | High thermal expansion |
| PP-R multilayer pipe | For cold and hot water | High strength and heat resistance | Very low thermal expansion |
There are several dozen types of fittings, but the most popular are:
- Couplings - cylindrical products, the diameter of which is the same and corresponds to the diameter of the connected cuts.
- Adapters - parts for joining workpieces of different sizes.
- Corners - products for changing the direction of the route. Parts are bent at an angle of 45-90 degrees. The use of corners when bending the water supply system is mandatory. It is strictly forbidden to bend the plastic after heating, because the walls become thinner, while the pipe loses its strength.
- Crosses and tees - fittings for connecting several workpieces in one place. Available in various configurations and sizes.
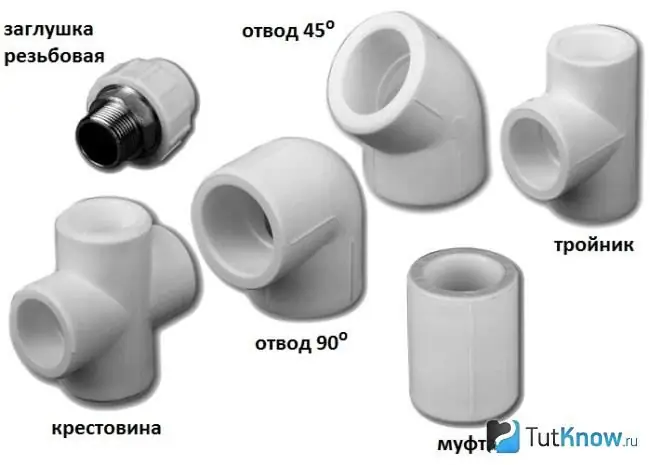
In the photo, accessories for polypropylene pipes
Other components are often used in the water supply system:
- Contours - factory-bent pipes, making it easy to bypass small obstacles. They are available in a large assortment, which allows you to choose samples that will pass at a minimum distance from the object.
- Compensators of various typesrequired to eliminate the consequences of thermal expansion of polypropylene pipes.
- Hole plugs, which are not planned to be used in the near future.
- Distribution nodes for collector piping, allowing to equalize the fluid pressure at different points of the water intake.
- Ball Valves - are placed in front of each plumbing fixture to shut off the water.
- Fastening clamps or clips - are used to fasten the line to the walls.
Technology for installing a water supply system from polypropylene pipes
Careful preparation is required for installation to proceed smoothly. Break the entire process into stages and think over each operation. First, study the properties of polypropylene products and complete design work. After completing the theoretical part, proceed to the assembly of the structure.
Development of a water supply system from polypropylene pipes
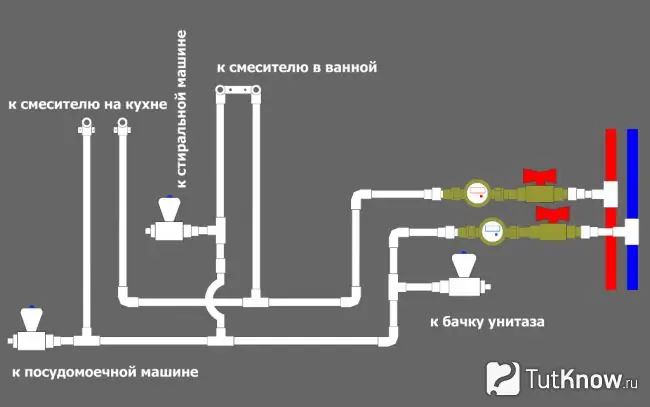
Water supply scheme made of polypropylene pipes
The water supply scheme is necessary for quick and high-quality installation of the structure. When designing a water supply system from polypropylene pipes, observe the requirements of SNiP and listen to the advice of specialists:
- Mark the location of the taps and water source.
- Show on the water supply diagram polypropylene pipes and everything that can affect the direction of the route. The branches with the minimum number of turns are considered optimal. A sharp change in the direction of the route reduces the head.
- Polypropylene pipes are welded together, so leave a good approach to the joint and space for a soldering iron.
- It is considered a good decision to hide the highway in the grooves of the walls or behind the plasterboard sheets.
- Place vertical lines in the corners of the room, horizontal lines near the floor near the walls.
- Select the pipe routing method (tee or collector) and show the location of the branches.
- To save money and materials, route in the middle of the trunk. For the same purposes, connect new lines to existing ones.
- Consider where you need to place expansion joints to accommodate the linear expansion of the route. They prevent the appearance of stresses in seams and joints. Compensators must be installed in hot water supply systems.
- Decide where in the future it is possible to connect additional lines to the pipelines. Draw temporary conclusions in these places and drown them.
Preparation for the installation of polypropylene pipes
At this stage, decide on the size of polypropylene pipes for the water supply, purchase consumables and a special tool to get the job done.
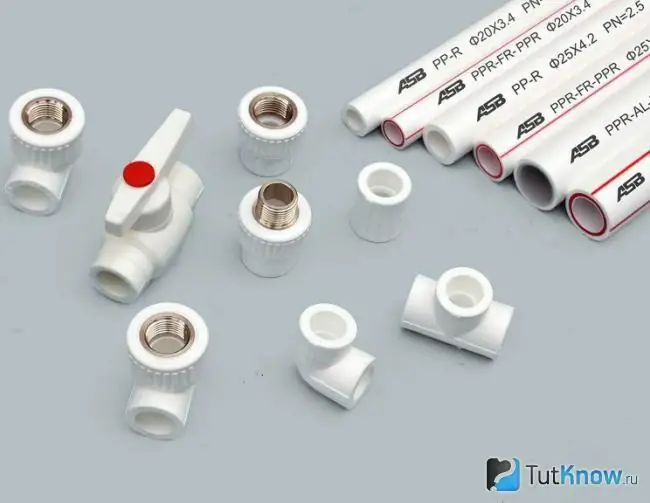
In the photo there are polypropylene pipes and fittings for installing a water supply system
When buying pipes, pay attention to the following points:
- Each type of polypropylene pipes has its own advantages and disadvantages and is designed for use in certain conditions. Therefore, the products you choose must meet the requirements of the consumer.
- It is easiest to determine the footage of workpieces and the number of fittings according to a pre-developed water supply scheme. Buy all blanks with a margin.
- When choosing components, inspect them carefully. The presence of roughness and sagging on the surface is not allowed.
- The cut of the product should be round, the thickness of the walls is the same along the entire length.
- Try sliding the fitting over the pipe. If the parts are connected, then you have a defective product in front of you. It is impossible to join the workpieces without heating with a special soldering iron.
To do the installation of polypropylene pipes for water supply with your own hands, buy or rent assembly tools. Do not use available tools. Only special devices will allow you to work easily and quickly and get a high-quality connection.
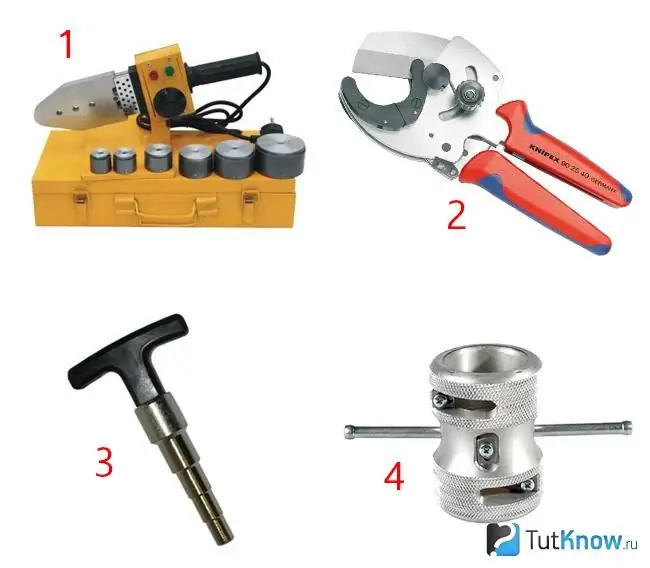
In the photo, a tool for welding polypropylene pipes
Tools that are used when welding individual parts of the line:
- Soldering iron (welding machine) for attaching parts to each other. Do not choose cheap equipment, the price may indicate low quality of the device. It is necessary to select Teflon nozzles for it, the diameter of which corresponds to the diameter of the pipes. Usually this kit comes with a soldering iron. It is not recommended to use sleeves partially covered with Teflon. In this place, the plastic will stick, which leads to a deterioration in the quality of the joint. If you are going to install the plumbing yourself, buy a device with a special stand for holding it in the working position, because you will have to work by weight.
- Ring cutter (pipe cutter) or special pliers for cutting plastic products. The device allows you to cut even thin-walled products without breaking their shape. If there are few joints, you can get by with an ordinary hacksaw for wood.
- Calibrator - a device in the form of a reamer for chamfering from the ends of pipes and preparing the surface for soldering.
- Shaver - a device for removing the aluminum layer located outside. If a metal layer is inside the plastic, the operation is not performed.
Welding polypropylene pipes
Soldering pipes are considered the best option for polypropylene plumbing. It is used to fasten adjacent products made of the same material, preferably even from the same manufacturer. It is better to work with two people: an assistant is needed to hold the apparatus at a given distance from the pipe
Take the job very seriously, because the joints are one-piece.
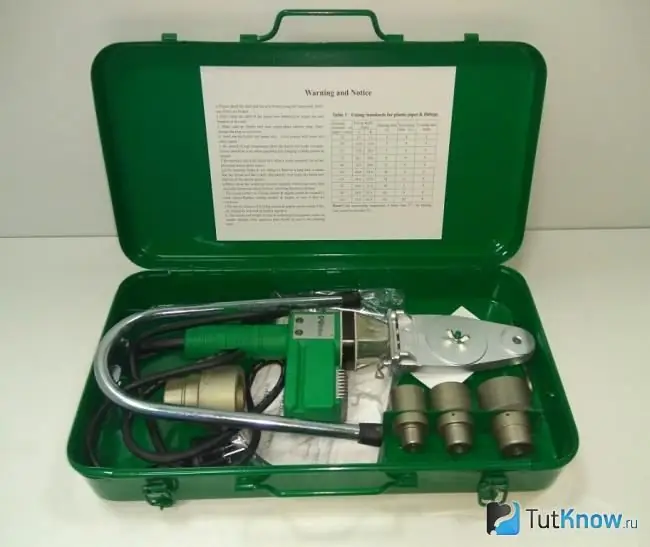
Photo of a soldering iron for polypropylene pipes
If you have never soldered plastic with your own hands before, practice on unnecessary corners and cuts. Please note that soldering at the table is easier than assembling the trunk at a regular place.
On the finished plumbing plan, select areas that can be welded separately, and then connected to the main line. In this way, work carried out on the weight can be reduced.
First, assemble and fasten those parts of the line that cannot be assembled separately. Leads should remain on the wall, to which branches mounted to the side will subsequently be connected.
Important! Start laying water pipes from polypropylene pipes from plumbing fixtures.
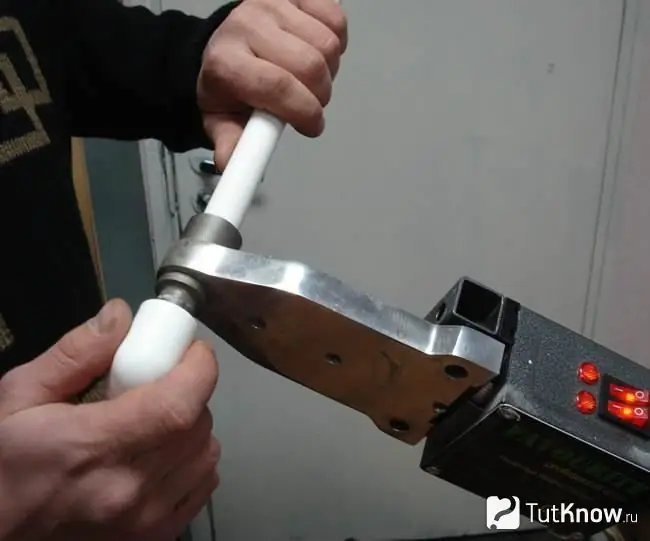
Work on assembling the line by welding is carried out in the following sequence:
- Install the main elements: taps, washbasins and other plumbing fixtures.
- Mark with a marker on the wall (or on another surface) the route between the plumbing using the developed scheme.
- Fasten movable and fixed clamps along the route for attaching polypropylene pipes for water supply.
- Measure a piece of pipe on the workpiece that corresponds to the size on the plumbing diagram, taking into account the entry of the pipe into the connector, and cut it off with a pipe cutter. If not, use a hacksaw or sharp knife. It is recommended to cut the product at an angle of 90 degrees.
- Clean the cut area from burrs (if any), and the parts from dust. Make sure they are dry. Even small damp areas will degrade the quality of the joint. Degrease surfaces with alcohol.
- Determine the size that the pipe will fit into the fitting. Measure this distance from its end, add 1 mm and mark. Use a ruler or other measuring instrument to determine the size to avoid errors.
- Remove the foil from the outside reinforced pipe between the end and the mark.
- Chamfer the end of the workpiece. Regulatory documents allow chamfering at an angle of 45 degrees to half the wall thickness of the product. The operation is performed by a calibrator or other instrument. Make sure material is removed evenly.
- Before soldering polypropylene pipes for water supply, read the instructions for use of the soldering iron.
- Match nozzles to fit pipe and fitting. They must fit tightly over the workpieces so that there is good contact between the parts. The sleeves are coated with Teflon, which prevents them from sticking to plastic.
- Slide the nozzles of the appropriate diameter onto the device.
- Attach the soldering iron to the stand, securing it from moving. If necessary, have an assistant hold the attachment in position.
- Turn on the machine and set it to a temperature of 260 degrees (if the soldering iron has a regulator). It is optimal for plastic and safe for Teflon-coated tips. No other temperature is used in soldering irons, so there is no need to worry if the regulator is missing. The readiness of the device for further operation is determined by the indicator.
- Install the pipe at the same time into the sleeve-like nozzle and the fitting into the pin-like nozzle. The workpiece is inserted into the sleeve with effort due to the special shape of the device: the nozzle is made in the form of a cone with an inclination of 5 degrees, and the flat part starts only from the middle. Press the pipe into the sleeve until it stops, but no more. If you apply force further, a thickening will appear at the end, directed inward, which will reduce the cross-section of the product.
- Wait for the workpieces to heat up. The process usually takes 10-15 seconds. During this time, the outer surface of the pipe and the inner fitting will melt. The warm-up time is indicated in the operating instructions for the device, and it is necessary to strictly adhere to the specified requirements. It depends on the diameter of the product and the thickness of the walls. Temperature information can also be obtained from special tables in international standards. You cannot overheat the parts - they will lose their shape. If removed earlier, there may be a leak in this area.
- Remove the parts from the soldering iron and quickly articulate using the pre-marked marks. Join the parts smoothly, turning is not allowed. During the process, check the alignment of the pipe and fitting axes.
- There are only a few seconds to correct the position of the products. The heated plastic of the pipe and the connector is mixed and, after solidification, forms a single structure.
- Fix the parts in a stationary state for 20-30 seconds so that the plastic hardens. After that, any changes in their relative position can lead to a loss of sealing at the joint. You can move the node after 15 minutes. Test for strength and tightness - every other day.
- Inspect the Teflon tips after welding. If you find any plastic residues, remove it with a wooden object. Carry out the procedure until the plastic is frozen.
- After assembling all the assemblies, connect them to the pipes that were installed in the first place and fixed to the walls.
- Fix the structure to the walls with cable ties according to the recommendations below.
Note! A sign of a good connection is the bead that forms around the pipe. He appears inside, but he is not visible. If the dimensions of the collar are the same around the circumference, then the parts are warmed up evenly. With uneven heating, the height of the thickening changes, and a leak may appear at the lowest point.
The use of crimp fittings for connecting polypropylene pipes
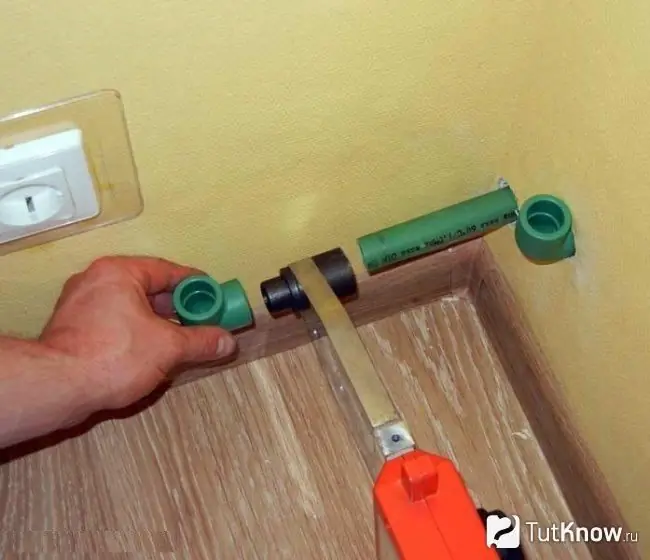
In this way, the connection of polypropylene pipes for water supply to metal products is performed. The pieces are joined with crimp fittings consisting of threaded parts and clamping rings. The joints can withstand pressures up to 16 atmospheres.
The work is performed in the following sequence:
- Match the compression fitting to the outside diameter of the pipe.
- Cut the workpiece to the desired size.
- Insert the pipe into the connector, slide on the ferrule and nut.
- Screw on the nut beforehand by hand until it stops, and then finally with a special crimping wrench.
- Thread the fitting into a metal pipe or other connector on the product. For security, screw the sealing thread onto the threaded part.
Fastening polypropylene pipes to the wall
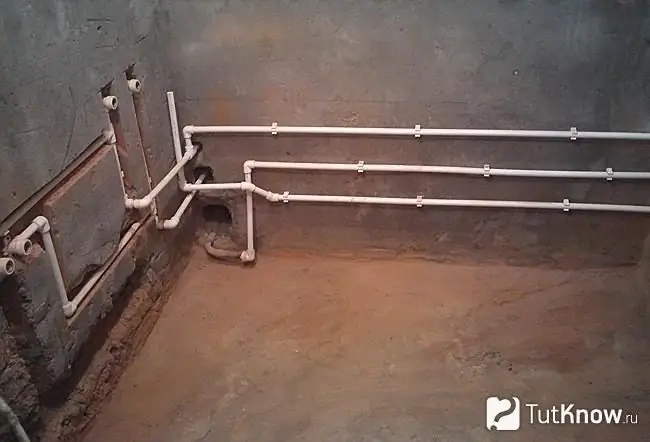
After welding the line, fix it to the walls, taking into account the coefficient of thermal expansion of the material. Single-layer pipes are elongated the most. For reinforced ones, it is 5 times less. Work is carried out at least 1 hour after connecting the entire system.
If polypropylene pipes for a water supply system are improperly fastened, longitudinal stress appears in the structure, which reduces its strength and reduces its service life
To stay out of trouble, follow our recommendations:
- Do not use short branches with increased rigidity in the line.
- The distance between the clamps must comply with the requirements of regulatory documents. It is impossible to fix the water supply too rarely, this can lead to their sagging and pinching at the location of the clamps.
- Use fixed and movable supports to fix the pipes. The first firmly fix the product and prevent it from expanding. They are used to fix individual sections of the highway (risers, branch points). Movable supports allow the pipes to expand freely.
Prices for the installation of a water supply system from polypropylene pipes
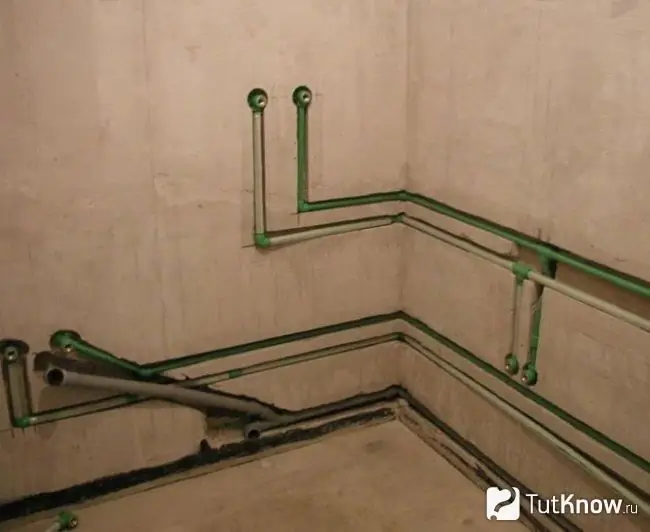
In the photo there is a hidden wiring of polypropylene pipes
It is not difficult to assemble a water supply system from polypropylene pipes with your own hands, especially since the manufacturers have done everything to facilitate the assembly of the structure. However, if the installation is performed by inexperienced users, there will be no confidence in the quality of the work performed. In the absence of experienced professionals among relatives and friends, you can turn to professional plumbers.
When calculating the cost of installing a water supply system from polypropylene pipes, it is necessary to take into account all the nuances of the work. The following factors form prices:
- Type of polypropylene pipes. Outside braided products are more expensive due to the need to remove the outer layer at the brazed area.
- A soldering iron is used to weld the pieces, which should be held stationary in a predetermined location. If the conditions are difficult, the foreman will need an assistant, the price of the work will be higher, because he will also have to pay.
- The complexity of the developed water supply project and non-standard wishes of the customer.
- Number of storeys of the house, its area, unusual design.
- The number of plumbing fixtures and mechanisms to which water must be supplied, and their location in the house.
- When installing polypropylene pipes, it is necessary to pay for the drilling of technological holes in the wall for laying the route.
- If the customer saved on the cost of the material and bought low-quality blanks, the master will spend more time on their installation, therefore, he will increase the prices for his services.
The tables below show the cost of individual operations when installing polypropylene pipes.
Installation price of polypropylene pipes in Ukraine:
| Job title | Conditions | unit of measurement | Price, UAH. |
| Installation of route d 20-32 mm | r.m. | 15-40 | |
| Soldering fittings (angle, coupling) d 20-32 mm | PCS. | 10-20 | |
| Soldering fittings (tee) d 20-32 mm | PCS. | 20-25 | |
| Pipe supply to plumbing equipment | Depending on the type of equipment | point | From 160 |
| Fastening the pipeline | point | From 12 | |
| Installation of a ball valve | Depending on the diameter | point | From 30 |
| Slitting to hide pipes in the wall | Depending on the wall material | m. | 70-150 |
The price of installing polypropylene pipes in Russia:
| Job title | Conditions | unit of measurement | price, rub. |
| Installation of route d 20-32 mm | r.m. | 250-300 | |
| Soldering fittings (angle, coupling) d 20-32 mm | PCS. | 100-150 | |
| Soldering fittings (tee) d 20-32 mm | PCS. | 150-200 | |
| Pipe supply to plumbing equipment | Depending on the type of equipment | point | From 300 |
| Fastening the pipeline | point | From 80 | |
| Installation of a ball valve | Depending on the diameter | point | From 150 |
| Slitting to hide pipes in the wall | Depending on the wall material | m. | 350-800 |
How to make a water supply system from polypropylene pipes - watch the video:

It is not difficult to assemble a water supply system from polypropylene pipes with your own hands. To do this, you should learn how to use a soldering machine to connect workpieces. In addition, you will need knowledge of the SNiP requirements for water pipes, which should be strictly followed during installation work.


