
- Author Arianna Cook cook@women-community.com.
- Public 2023-12-17 14:23.
- Last modified 2025-01-23 09:40.
What is a semi-dry screed, what are the main types, their advantages and disadvantages, the technology for preparing the mixture and installing the rough base. A semi-dry screed is a base for flooring that is created using a hard, semi-dry mortar of sand and cement. Additional strength is given to it by a metal reinforcing structure or polypropylene fiber.
The main types of semi-dry screeds

Today there are several types of semi-dry screeds, which differ from each other in installation technology and technical features.
Semi-dry floor screed is presented in the following varieties:
- No backing … It is an economical choice for leveling surfaces. The product is laid on a concrete floor, and so that it does not absorb all the moisture from the solution, the coating is primed. This option is most often used in the process of repairing industrial and public buildings.
- Screed with thermal insulation qualities … In this case, roll insulation is laid between the main layers of the coating. The most commonly used mineral wool or foam.
- Screed with noise insulation … It will help absorb unnecessary sounds and noises in the room. The soundproofing material is fixed between the subfloor layers. It must be additionally protected from moisture ingress.
Regardless of what materials are additionally included in the screed, such a base will be strong and durable. During drying, it will not settle or crack, so this is an excellent option for further finishing the floor.
Advantages and disadvantages of a semi-dry floor screed

Before preparing a semi-dry mixture and proceeding with installation, familiarize yourself with the pros and cons of this base.
The advantages of this floor are as follows:
- A budget option for installing a sub-floor. The materials used (cement, sand, fiberglass) are quite inexpensive, and it will not be difficult to buy them in any hardware store. The cost of pouring a semi-dry screed is an order of magnitude less than other methods of leveling floors, which can significantly reduce the cost of repair work.
- Additional procedures for leveling the base are not required. It is possible to create a perfectly flat surface without the use of self-leveling self-leveling self-leveling mixtures.
- During the creation of such a screed, a large amount of water is not used, and in this case, the possibility of moisture entering the ceiling of the lower room is completely excluded.
- A high level of heat and sound insulation is achieved due to the porous structure of the composition.
- After the semi-dry screed material has dried, there will be no defects or cracks on the surface of the coating, which are often found in concrete subfloors.
- In the process of work, there is less moisture and dirt, in contrast to laying "wet" cement-sand mortar.
- Such a screed, as a rule, contains a light reinforcing fiber. It exerts practically no significant load on the floor.
In addition, there are such disadvantages of a semi-dry screed:
- The screed mass has a reduced fluidity. When mixing a solution, this requires the use of additional equipment. Making the composition by hand is quite problematic. The quality of the work will depend directly on how correctly the solution is mixed.
- The finished semi-dry screed should be protected from water ingress until it is completely dry. The processes of hydration of water in the composition did not go through completely, which means that the effect of moisture will provoke swelling of the cement. This threatens the appearance of cracks.
- Sometimes a semi-dry screed is not compacted enough. This will lead in the future to partial destruction of it under the floor covering. A squeaking sound may also appear.
Semi-dry floor screed technology
The scheme for laying such a screed is simple and consists of several basic steps: preparing the working base, laying additional layers of hydro and thermal insulation, installing beacons, distributing the product and leveling. The main differences between the technology of a semi-dry screed and working with a "wet" one during installation will be at the stages of applying the mixture and leveling it.
Preparing the subfloor before laying the screed

The preparatory stage plays an important role in the screed installation process. The durability of the coating depends on how correctly these works are carried out.
We carry out the preparation of the base according to the following scheme:
- We remove old skirting boards, decorative flooring, if any.
- We completely remove the old screed from the floor surface.
- After dismantling, we clean the coating of dirt and debris.
- If there are traces of fungus or mold, the surface must be treated with special antiseptics.
- Next, the coating needs to be primed. But this is an optional step if you plan to lay the thermal insulation layer.
Determination of the floor level for a semi-dry screed

In order to correctly calculate the amount of required materials and make a semi-dry screed qualitatively, you need to determine the level of the horizon in the room. To do this, draw a line on the walls of the room using a manual building level or a laser level.
We project a point onto the wall and mark it with a pen or pencil. We put down the same points around the entire perimeter of the room. We connect them in one line. This way, you get a smooth and crisp line that does not take into account the unevenness of the base.
You also need to determine the highest point of the horizon in order to identify possible differences in the height of the floor covering, and correct them in time with a small additional amount of semi-dry mixture. To do this, take a ruler and take measurements from the floor surface to the line on the wall. We try to make more marks.
A small figure indicates a high floor level (bumps). Big - about low (pits). This data will help determine the thickness of the semi-dry screed and material consumption. For 1 mm of the drop, approximately 0.18 cubic meters of the product is used. Such a calculation is also suitable for correcting irregularities on the finished rough surface, if they appear.
Installation of insulation layers on the floor

Most often, a polyethylene film is used as a waterproofing material, the thickness of which can be from 100 to 200 microns. The overlap of the film strips on each other should be at least 15 cm, and rise to the walls by 20 cm. There is no need to fix the film on the base.
It should be noted that the installation of waterproofing is necessary, as this is due to the technical features of the screed. As a result of installation work, a layer with a high degree of vapor permeability is formed in the subfloor. Such a screed is called floating.
Without waterproofing, the floor can only withstand light loads. The waterproofing layer will prevent a lot of moisture from absorbing into the main floor covering and will help the semi-dry screed mixture to better adhere to the surface.
Next, insulation sheets are installed on top of the film layer. It is recommended to use dense materials such as plain or extruded polystyrene foam. They should fit snugly to each other, but not exert strong pressure on the walls of the room, since after a while parts of the heat insulator may begin to rise. This will lead to cracks and destruction of the screed.
If you decide to use expanded clay as insulation during the installation of the floor, then choose a material with a spherical granule size from 3 to 7 mm. The expanded clay layer should be well compacted and even. Its thickness ranges from 35 to 80 mm.
Installation of beacons for semi-dry screed

In order to qualitatively level the floor surface, it is necessary to use beacons - special slats, along which you need to navigate when distributing a semi-dry screed. It is recommended to use T-shaped profiles for work.
They are distributed parallel to each other. The first rail is fixed at a distance of half a meter from the wall, all subsequent beacons are installed in 15 cm increments.
It is necessary to fix the profiles on the mortar, taking into account the level of the laying height of the semi-dry screed. It is not necessary to add gypsum or putty to the mixture for fixing the beacons.
It is important that the profiles are in the same plane and strictly parallel to each other and perpendicular to the floor surface. For this, it is recommended to use a building level or level.
Preparation of a solution for a semi-dry screed

In the process of preparing the solution, it is necessary to adhere to the proportion of cement and sand one to three. The recommended grade of Portland cement is 400D20. As for the sand, you should purchase a washed river or quarry. Its size modulus should not be higher than 2, 5. It is important that the sand does not contain peat impurities, plant residues. And the limit of finely dispersed clay inclusions is no more than three percent.
If necessary, propylene fiber is added - at the rate of half a kilogram per cubic meter. Thus, you will make the screed more dense, and it will definitely not form cracks over time. Thanks to the fibers, the mortar will be more elastic and easier to work with. In practice, the mixture turns out to be similar to a simple cement-sand screed.
Due to the fact that the moisture content of the sand is unstable, you need to add water "by eye", there is no exact proportion. For this reason, it is very easy to overdo it and make the solution too liquid, which will spread over the surface. Ideally, if you squeeze the mixture in a fist, no water droplets should protrude, and the lump itself should not lose shape. If the material is applied to the flooring and smoothed with a trowel, the agent should not remain on the tool, but will form a smooth base.
If you have added too much water, you can add a little dry mix of sand and cement in the correct proportion. Please note that the fiberglass must be mixed with water and gradually pour this mixture into the sand-cement.
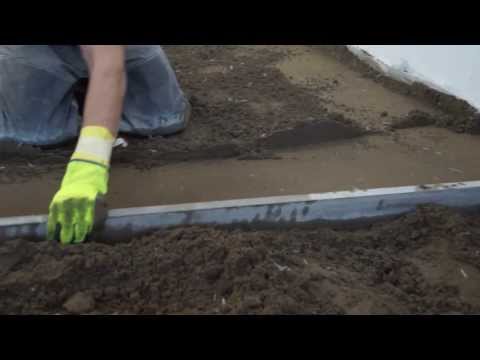
Laying a semi-dry floor screed

After the solution is prepared, you need to immediately start laying it. A semi-dry screed with your own hands is performed without any particular difficulties, because the technology of this type of repair work is quite simple:
- We apply the screed to the floor, starting from the perimeter, that is, near the walls. Thus, you also secure the edges of the waterproofing film.
- Next, we begin to fill the voids between the beacons with a solution.
- When laying the screed, it is better to work together: one person prepares the mixture, the second applies it to the surface and levels it. The solution is best tamped down with your feet.
- We level the rammed mixture with a rule that should rest against the beacons with its edges. We move it gradually, from side to side. We slowly move them forward.
- If you see that somewhere there is not enough solution, then add it with a trowel or trowel and press down. After that, we go through the surface once again using the rule.
- In order for the flooring to last for many years, it is better to use special equipment for a semi-dry screed for the final treatment - a grouting machine. With its help, you will qualitatively level the surface, as well as additionally compact it.
- The grouting process should be started no earlier than twenty minutes after the floor has been compared, but the grout must not be allowed to "grasp" completely. The result is a perfectly smooth surface.
- It is recommended to cover the finished base with a film in order to create optimal conditions for the mixture to dry on the first day.
12 hours after installation, the screed will already be able to withstand the weight of an adult, and after 96 it is ready for the installation of the final floor covering. It is very important to control the entire drying process of a semi-dry mixture: no defects should form on its surface, as they will lead to a deterioration in the quality of the floor.
Semi-dry screed mortar is one of the most optimal options for creating a high-quality base for further laying tiles, parquet boards or laminate.
How to make a semi-dry floor screed - watch the video:
The installation procedure for a semi-dry screed is simple, but the main thing is to observe and perform all the stages of laying with high quality - correctly set the level and beacons, prepare and lay the solution. Before starting work, study the technical properties and the device of a semi-dry screed in order to avoid errors in work, which can lead to the appearance of defects on the surface.


