
- Author Arianna Cook cook@women-community.com.
- Public 2023-12-17 14:23.
- Last modified 2025-01-23 09:40.
Advantages and disadvantages of wooden floors, requirements for the structure and its functionality, preparatory work and laying of floors, additional insulation. Installation of a wooden floor is a technologically complex process, which, nevertheless, can be done independently, if you stock up on theoretical knowledge and the necessary tools. Such coatings are distinguished by their perfection and aesthetics. They will look great not only in private cottages, but also in a traditional city apartment. Most importantly, wood flooring creates an amazing microclimate due to its natural qualities.
Advantages and disadvantages of wooden floors

There are plenty of advantages of wood flooring, and thanks to them, such floors do not lose their relevance to this day:
- Naturalness … Wood is considered a "breathable" material, and any natural constituent is natural in origin, unlike many popular synthetic materials.
- Favorable indoor climate … The wood has an incomparable scent that recalls the long-forgotten traditions of our ancestors. Both children and adults feel better in rooms with wood trim.
- Safety for residents … It goes without saying that wood does not emit any impurities harmful to human health. On the contrary, it has a relaxing and relaxing effect.
- Ease of care … To maintain wooden floors, dry and damp cleaning is sufficient without the addition of harsh chemicals.
- Excellent aesthetic appearance … Wood is such a popular material that even unnatural materials tend to be made "wood-like".
- Good thermal insulation … Wood has long been famous for its ability to retain heat indoors and therefore used to create structures.
The disadvantages of wooden floors are much less, but the main one is the relatively high cost in relation to many popular synthetic materials. Of course, in terms of labor costs, such floors are much higher than laying linoleum or carpet indoors.
Over time, such a floor can creak and form cracks in the floorboards due to drying out. Wood floors will require periodic renewal, the frequency of which depends on the conditions in which it is used.
Wood floor requirements

The process of laying such a coating requires certain knowledge and skills. From a technical point of view, the floor must have maximum rigidity and minimum deflection properties in order to ensure comfortable operation. On the other hand, the construction and arrangement of a wooden floor must be technologically simple.
In terms of its functionality, such a coating must meet the following requirements:
- Abrasion resistance … Wood is a material with an average resistance to deformation and physical stress. This results in the durability and reliability of most types of wood.
- Thermal and sound insulation … Wood perfectly retains heat and does not allow the propagation of noise and sounds, unlike plywood and chipboard.
- Water resistance … It is a water-repellent material, but under constant contact with water is subject to destruction.
- Compliance with fire safety regulations … The wood used in construction and decoration is treated with special solutions that provide protection against insects and rapid fire.
- Good bearing capacity … Hardwoods successfully play the role of beams, columns, which is evidenced by the use of wooden logs and other supporting structures during construction.
Wood floor installation technology
Installing a wooden floor requires careful selection of tools and wood. Consists of several main stages, from preparation to finishing.
Tools and materials for the construction of a wooden floor

At the preparatory stage, it is necessary to provide a supply of tools that will be needed to perform the work: a hammer, an electric drill, a screwdriver, a nail puller, a hacksaw, an ax, a level, gloves, nails, screws, screws. In addition to the stock of boards and logs, which depend on the area of the room, you need to prepare insulation and waterproofing. Experts recommend to carry out the installation closer to the end of the heating season. This is due to the fact that during this period the board has fewer opportunities to absorb excess moisture, which will then affect the appearance of the coating.
All wood that will be used for laying a wooden floor must be treated with special preparations that prevent the appearance of insects.
Works can be carried out with various types of wood, such as folded board, unedged board, chipboard and plywood, glued laminated timber and others.
Beams, like seam boards, are best suited for creating a finishing look. This layer can subsequently be painted or varnished, and in such a finished form will form the basis of future floors in the room.
As for the board itself, it is advisable to buy a solid board across the entire width of the room. Of the species, larch, beech, pine, oak and other types of wood are used most often.
Preparatory work before installing a wooden floor

It is necessary to start work after the completion of the stage of preparation of the premises. By this time, all other types of work should be completed: door frames with doors are installed, a ceiling with screeds is mounted, tiles or ceramic tiles are laid, plastered surfaces are dried.
Any moisture can have a detrimental effect on the quality of future wood floors. When laying the board, it is necessary that the air humidity in the room be in the range of 40-60%.
As for the installation method, the wooden board can be laid either on logs or in a parquet way. With the so-called parquet technology, the boards are fixed on a flat and prepared base - it can be a waterproof plywood sheet or, for example, chipboard. In this case, the total thickness of the finished floor in the assembly will be equal to 3-4 cm, including plywood, board and waterproofing.
In the case of laying on logs, there are some peculiarities. The very thickness of the board in this case should be about 40 millimeters, because it will have to withstand significant loads, avoiding noticeable deflections. But taking into account the thickness of the wooden logs, the ceiling height in the room will noticeably decrease (by 70-90 mm). Therefore, a wooden floor on logs will be especially appropriate in rooms with high ceilings. In this case, such a feature of the coating is not considered a disadvantage. But the key advantage of this method is the ability to hide any level drops from prying eyes. There is no need to make additional concrete screeds or weight the structure with heavy elements. Any wiring (telephone, electrical and even communications) is successfully laid under the floor.
Before starting the installation of wooden floors, the quality of the base base is determined. This can be done by tapping and visual inspection. There should be no cracks in a solid screed. If any areas have come off, they must be replaced with new ones. But when the screed changes, you will need to withstand another month of pause - during this period it will be able to dry completely, and the humidity in the room will acquire normal values.
Waterproofing wood flooring

This term is understood as a set of works, the main task of which is to ensure protection of wood floors and other elements of the building from the harmful effects of moisture.
It is especially important to make waterproofing in houses and cottages of individual buildings, since they are more likely to be flooded and border on basements. Any wood quickly begins to absorb water and deteriorates over time. The most reliable and effective way of waterproofing when installing a wooden floor is to cover the floor with sheet or roll polymer material.
Before starting work, all wooden surfaces must be thoroughly dried. The screed is covered with strips of polyethylene, which is sold in rolls. An overlap is made between the strips, equal to 20 cm. As sound insulation, a layer of rubber or pressed cork can be laid. From above, the material is covered with a waterproofing film, and the joints are carefully fixed.
A layer of mastic of about 1.5-2 mm is applied to the wood. It is necessary for a better connection between wood and polymer. Strips of waterproofing material are laid on top, and the joints must be glued.
Laying logs for wooden floors

After waterproofing, you can proceed to the installation of the lags themselves. The durability and operational strength of the entire structure will directly depend on the quality of this stage. For the lag, a 50 x 100 mm bar is suitable, which is pre-soaked with an antiseptic solution and thoroughly dried. The moisture content of the wood should not exceed 15%.
How to lay the timber correctly, we will consider further. The direction is more connected with the design ideas of the customer, that is, it can be different. But an obligatory rule: the location of the lags in relation to the boards should always be strictly perpendicular. Often experts recommend laying the boards along the direction of the light.
The width of the step between the lags will be from 50 to 55 cm. Its length will depend on the natural characteristics of the material. The thicker and stronger the board is, the wider the distance between the timber can be, which can withstand such a load. The logs are fastened to the base with dowels every half a meter and trimmed with wooden wedges.
The modern building materials market offers specially prepared joists that are adjustable with spacer screws. Thus, the installation process can become much easier, but the height of the ceilings in the room will also decrease.
It so happens that when walking on wooden floors, there are booming sounds associated with the voids inside. To avoid this, the space is filled with fibreboard in 2 or even 3 layers.
How to make a rough wood flooring

In the composition of the wooden coating, a rough and final flooring is distinguished. To prepare the base base, bars are taken, across which an unedged board is stuffed. In terms of their thickness, lumber can be from 15 to 45 mm.
Experts advise to use low-grade wood if it is necessary to save on costs for a wooden floor. It is pretreated with an antiseptic solution. More often for this purpose, coniferous boards are purchased.
Each board under the rough draft should fit snugly together. After that, an insulating material is placed - for example, a layer of clay and sawdust with a height of 3-5 mm. Expanded clay can also act as a heater, which is covered with a layer of 5-10 centimeters.
After the heat insulator is installed, the subfloor is covered with a tongue-and-groove board. The gap from the heat insulator to the finishing coat should be in the range of 10-15 mm. Nails are used to attach the grooved board to the timber.
To provide ventilation, small slots (holes) can be made, which will be 5-6 cm in diameter. For additional air circulation, they resort to ventilation holes in the basement of the structure.
Another issue that needs to be addressed during installation is the organization of additional air ventilation in the floor. For this, several holes can be drilled, which are covered with a grid. Grooves are made along the tops of the beams, which will give an additional flow of air.
Wood floors can be electrically heated if precautions are taken.
Finishing floor device

For clean floors, get a well-dried and milled board. It has a special tongue / groove edge and a longitudinal ventilation slot. Such material is always treated with protective compounds.
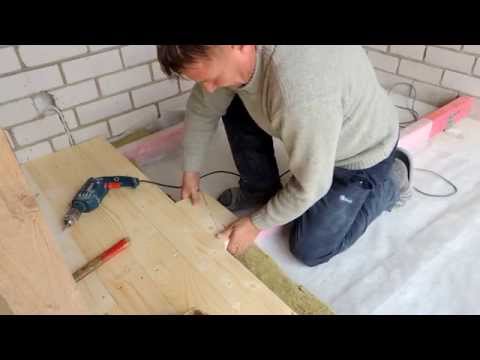
They start lining the floorboard after laying the logs and filling the voids. During installation, make sure that the tree rings on adjacent boards are facing in different directions. They begin to lay them at a distance of 1-2 cm from the wall, and the first row is aligned along the stretched twine. They are attached to each installed lag. Subsequent boards are threaded into the grooves, knocked out with a wooden hammer and finally fastened with nails. The size of the boards is set in such a way that the joint passes in the middle of each log. The nails are hammered in such a way that the cap goes 2-3 mm deep. Do not be afraid of the appearance of holes: they are subsequently treated with putty and additionally painted.
You can use long screws for installation - they are considered more reliable, but their installation is technologically more difficult. First, you need to drill holes for the screw, and then screw the screw into each one in turn.
Now let's talk about how to make a wooden floor that will not be stained, but only covered with colorless varnish. For such situations, you will need to stock up on open and hidden mounts. Open fasteners are special nails that are equipped with decorative elements. Therefore, they are hammered at the same distance from each other, within the same direction along the line.
Hidden fasteners are heads of nails or self-tapping screws, which are hidden in special recesses. Later, they are closed with corks, which are selected in size.
When laying a finishing coating based on planed boards, it is not enough to press them tightly together. To ensure better mating, stops, wedges and tightening devices are used.
Features of wood flooring

To hide the gap between the wall and the wooden floor, a wooden plinth is stuffed along the bottom. It is a curly rail under which you can run a telephone or Internet cable. Fix the plinth with small nails, screws or screws.
The best way to sand wood flooring is to use a sander. Sanding belts of various degrees of abrasiveness are produced for it. The larger one is used for hard wood, and the middle one is used for softer ones. Fine sandpaper is used in the final sanding process. The corners of the walls are more difficult to achieve with sanding, so a special angle machine is needed here.
The plank floor is sanded in several stages with a gradual decrease in the grain size of the nozzles. In the process, the flaws in the wood and the cracks found are closed.
After that, the painting procedure begins. First, you need to walk with a vacuum cleaner all over the floor to collect dust, small shavings and wood debris. Without this, high-quality painting cannot be achieved.
For the final finishing, a special polyurethane-based varnish is used, which is also applied in several layers. Additionally, a tinting composition can be applied under the varnish to change the color of the future coating.
Do-it-yourself wooden floor with a warm underground

In cases where the groundwater runs low enough, it is possible to install floors with an additional underground, which will act as a heater. For this, the following works are performed:
- A layer of soil is removed, on which a concrete base is laid with a layer thickness of at least 10 cm.
- Brick posts with a height of 15 cm are placed on this surface. Each post contains 4 bricks.
- In order to prevent the accumulation of dampness and decay of wood, roll waterproofing (roofing paper) is laid. Wooden gaskets can be placed on the waterproofing layer. Lags will subsequently lie on them. Finishing floorboards will be attached on top of the logs.
- As a waterproofing material, you can use hydroglass. It ensures proper drying of the cement screed, due to the fact that the moisture evaporates upwards and the base of the walls remains dry.
- Lags in this case are placed at a distance of 40-50 centimeters and they are placed not on the ceiling, but on an antiseptic slab.
- When organizing a warm subfloor, ventilation is important. Otherwise, moisture will accumulate, which will significantly shorten the life of wooden floors.
- You can ventilate the subfloor of such a coating with the help of special slots in the baseboard, the role of which is played by the windows cut out in them. From above, they are covered with nets or ventilation grilles.
- The subfloor itself can be filled with slag: this will provide additional insulation, but it is necessary to take care of a 5 cm layer, which will ensure air circulation in the underground.
Particular attention should be paid to the use of gidrotekloizol for owners of one-story houses, because it extends the operational period of wooden parts. How to make a wooden floor - watch the video:
Thus, despite the large assortment of building materials on the modern market, the wooden floor with your own hands has not lost its relevance at all. It is durable, has a special decorative effect and is able to give an unsurpassed feeling of home warmth and comfort. At the same time, people are constantly improving existing technologies and striving to make installation even simpler and more affordable.


